
On Windows, a file being deleted will not disappear immediately. It is still on computer and just not visible for veiwing. If you have deleted files from your desktop using the "Delete" option from your keyboard or right click on your mouse then those files can be retrieved from the Recycle Bin. Temporary deleted files are stored in the Recycle Bin, which can restored easily. By doing so, you will be able to retrieve the deleted files and it will appear on the original location of the file where you saved them in the first place. Evem the Recycle Bin was trashed, there are still methods to recover the files.
- Part 1: How to Recover Deleted Files from Recycle Bin with Hetman Partition Recovery
- Part 2: How to Recover Deleted Files from Recycle Bin after Empty via Windows Backup
- Part 3: How to Recover Deleted Files from Recycle Bin Using TunesBro Diskgeeker
Part 1 : How to Recover Deleted Files from Recycle Bin with Hetman Partition Recovery
If you failed to restore files from Windows Recycle Bin with the standard method, and freeware apps don’t give you the desired results, it’s time to choose a professional solution to recover deleted data.
There is no doubt that one of the most popular offers is Hetman Partition Recovery. The program easily recovers deleted data from various media – internal and external hard disks, USB drives, memory cards and other devices.
Step 1: Download Hetman Partition Recovery from the official website install and run it.
Step 2: The program will scan the system for the first time and identify all data storage devices connected to the computer. The program interface is similar to that of the Windows operating system which eliminates any difficulties when using it.
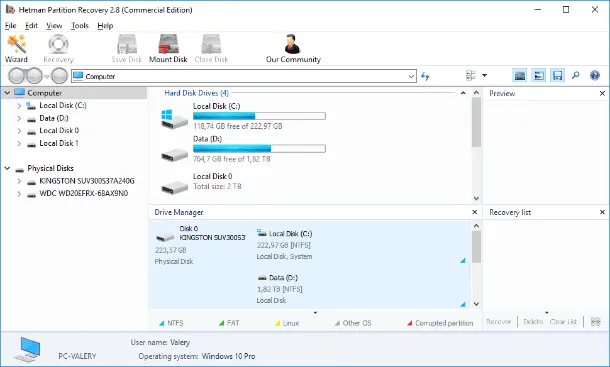
Step 3: In the main window, select the partition where your deleted data used to be, and double-click on it. The program will launch the file recovery wizard and offer you to decide on the type of analysis to be used for search and recovery of the deleted files. You can choose between the two options, Fast scan or Full analysis.
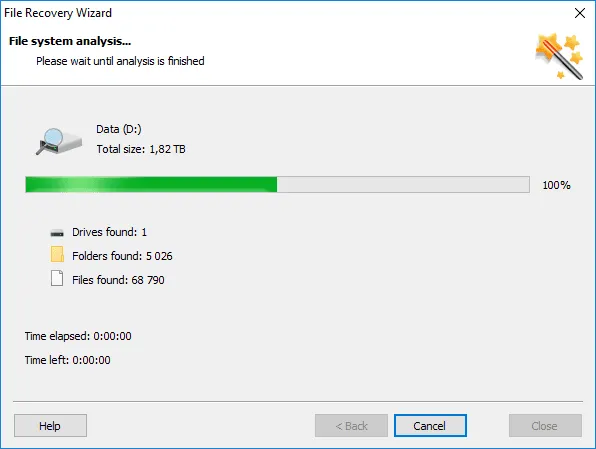
Step 4: The first one is good for recovering files deleted just recently. With full analysis, the program will look for any information available and restore the file system of the selected partition. As a result, all files available for recovery will be brought back. Check the option you prefer and click Next to continue.

Step 5: Depending on the selected option, the size of the disk and other additional settings, partition analysis may take from a few minutes to several hours. The process will be displayed in real-time mode so the user can watch the progress as it goes.
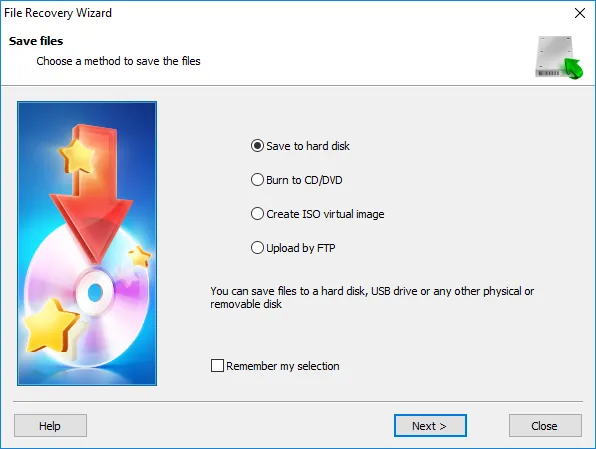
Step 6: When the analysis is over, click the Finish button to see the window containing recovered files. Find the files and folders you need, then click the Recovery button in the main ribbon. The wizard will let you choose what to do with the recovered files, with from the following variants available: to save files to the computer’s hard disk, burn them to a CD/DVD, create an ISO virtual image or upload data by FTP. Check one of the methods by setting the indicator next to it, and click Next to continue to the following page.
Step 7:After that, you have to specify additional options for saving the files: for example, choose the folder where you want to save them. You can specify your own folder or stick to the default choice. Additionally, you can restore folders structure (where the files are located) to have them displayed in the same folders where they used to be before being deleted etc.
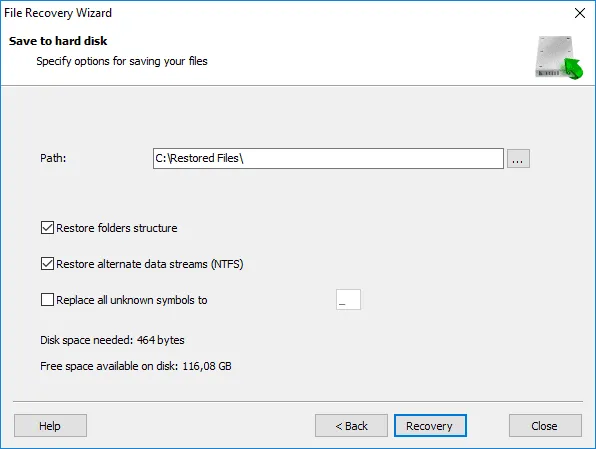
Step 8: Finally, click Recovery and save your files in accordance with the settings you have specified before. Check the saved files to make sure they are completely healthy and ready for use.
Part 2 : How to Recover Deleted Files from Recycle Bin after Empty via Windows Backup
The main issue occurs if you have permanently deleted them and cannot find your deleted files in the Recycle Bin. This may also happen if you have emptied the recycle bin earlier. In either of those scenarios, you will either have to use a Windows backup file to restore to the previous state or you will have to use a third party software to restore the deleted files and folders. We will be discussing both methods in this tutorial so that you can get back your deleted files even after you empty the recycle bin.
If you are using Windows Backup to create to restore the deleted files and folders then use the following procedure to get back your deleted files and documents.
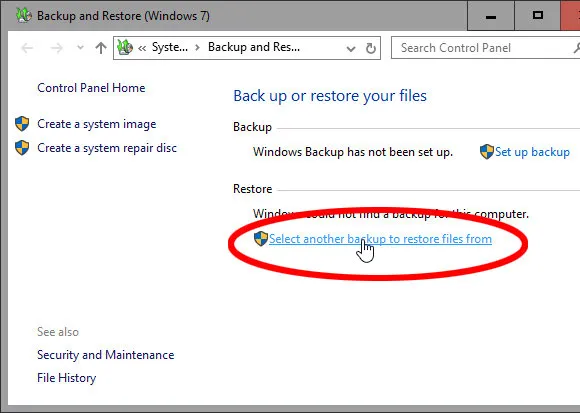
Step 1: Click on "Start" then "Control Panel" followed by "System and Maintenance".
Step 2: Click on "Backup and Restore".
Step 3: Click on "Restore my files" and simply follow the instruction provided in the wizard.
The second way to restore your deleted files is to put the computer in a previous state. To do this, you will have to proceed with the following steps
Step 1: Click on "Start" and then "My Computers"
Step 3: Open the folder in which you have saved the previous state file and click on "Restore previous version".
Step 3: This should take your computer to the previous state version where you can find all the deleted files and folders.
Part 3: Recover Deleted Files from Recycle Bin after Empty Using TunesBro DiskGeeker
If you already emptied the recycle bin and forgot backing up the computer, then the only way left is by using data recovery software. This type of program is able to scan and retrieve deleted files from physical drivers with smart recovery algorithms. In this tutorial, I will use TunesBro DiskGeeker as an example as it is a proven solution to recover deleted files from laptops, PCs and Macs. You can use the program to recover deleted documents, media files, photos and other kinds of files.
Step 1Install and Open TunesBro Diskgeeker
First, you will have to download TunesBro Diskgeeker on your computer and install it in the desired location. You can download the software directly from their website and it is free to try. After installation, launch TunesBro Diskgeeker on your computer to start the recovering process.
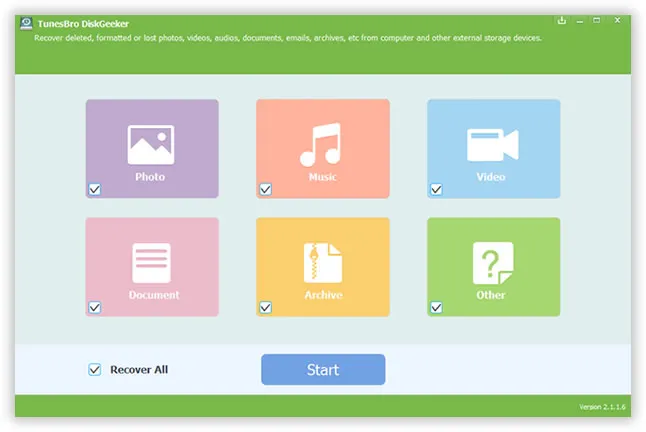
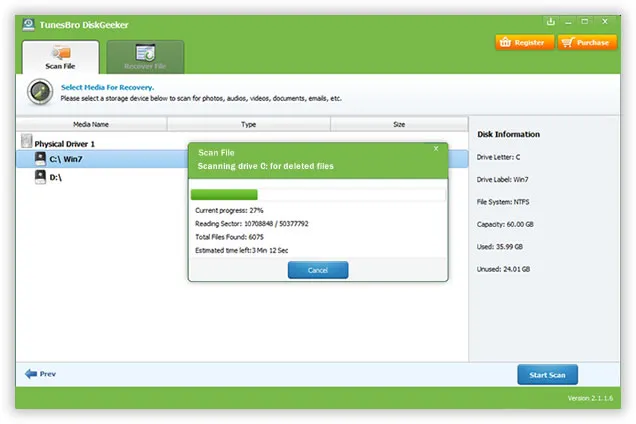
Step 2Scan Deleted Files from Recycle Bin
This software gives you the option to recover Photo, Music, Video, and Document, Archive or Other files. You can either scan for all files in the entire computer which may take a long time or you can select the file types and narrow the searches so that the process can be completed quicker. Finally click "Start Scan" to initiate the scanning process.
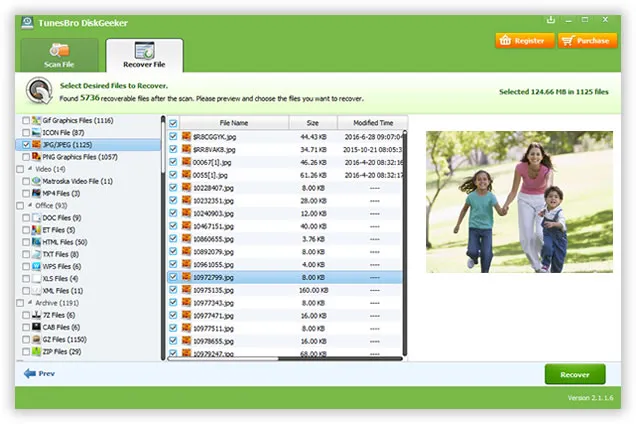
Step 3Preview and Recover Deleted Files from Recycle Bin
After the software finished the scanning process, you will be able to preview the deleted files before recovering. You can either recover all the files or you can recover only selected files on your computer again. The software will show all the files and folders categorized in their specific file types. Finally click on "Recover" to start restoring your files on your computer.
Conclusion:
If you have followed the above methods correctly then at the end of the day, you will be able to recover the deleted files without any problem. It is always recommended to create backups of your computer regularly in case you lose your data later. Also, you may consider uploading important files to online cloud servers to access them from anywhere you want. Hopefully, you found this article useful and were able to recover your deleted files.
Related Articles & Tips
-
Recover Data from Dead or Broken Hard Drive
![[Solved] Recover Data from Mac](images/data_recovery/mac-recovery-2.webp)

- HOT ARTICLES
- • Recover Deleted Files from Computer
- Recover Formatted Data from Hard Drive
- How to Recover File from Mac Trash After Empty
- • How to Undelete Mac Files
- Recover Data from MacBook
- • Restore Data from an IDE Hard Drive
- • Restore Lost Files after Windows 10 Update
- • How to Retrieve Deleted Documents from Mac
- SSD Data Recovery
- • Recover Files from Formatted SD Card
- • Recover Deleted Photos from Camera Memory Card
- • USB Data Recovery
- • Recover Deleted Video from Camcorder
- • How to Recover Files from a Pen Drive
- • External Hard Drive Recovery In Simple Steps
- • Recover Data from Seagate External Hard Drive
- • Western Digital Data Recovery
- Useful TIPS