Enabling or disabling Built-in administrator accounts on Windows 10 find its course when you wish to keep your built-in admin account secured for a particular period of time. For instance, you are going out for a vacation, and since your computer has multiple registered accounts for your siblings and family members, you are dreading that your admin account might get exploited by any of your known users. Thus in order to secure your parameters, you simply disable the admin account. After you come back home, you can enable it again to start your pending work again.
Since admin account is the only account which allows all the admin privileges to the user, disabling the account is a great necessity when you have a doubt regarding its protection. Here in this article, we would show you three wonderful methods which will at its best assist you get rid of your trouble. All that you have to do is to follow it step by step without any mistake.
Method #1: Enable and Disable Built-in Administrator Account Windows 10 using Command Prompt
Command prompt is a command line interpreter and one of the most powerful tools available in Windows OS. Here we would use it to run certain commands which can accomplish without having you to go through laborious operations. Read carefully the steps to know how it actually works:
Step 1. Turn on your computer and from the main desktop screen press “Windows + R” to open the “Run” mini dialogue box at the bottom left corner of the screen.
Step 2. You can press “Windows + X” to open the quick menu and select “command prompt (admin)” to run it with admin rights.
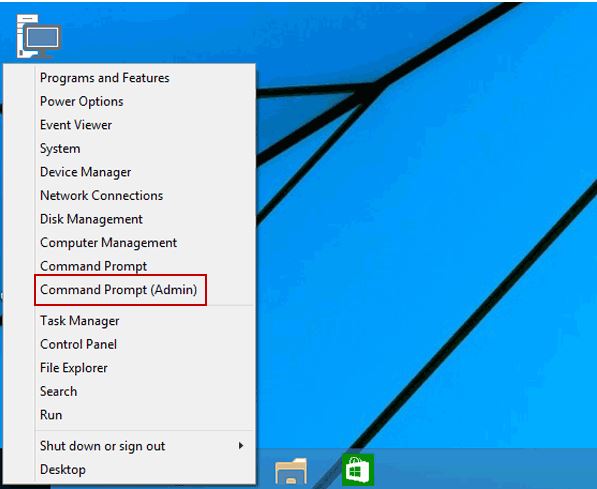
NOTE: You can also type in “cmd” and hit “Enter”. The black dialogue box of cmd will instantly appear.
Step 3. Select “Yes” from the “User Account Control” prompt.
Step 4. Now type in “net user administrator/ active:yes” and press “Enter” to enable the admin account.
Step 5. You can also type in “net user administrator/ active:no” and hit “Enter” to disable the admin account.
Method #2: Enable and Disable the built-in Administrator Account with Local Group Policy Editor
In this section we would make use of Group Policy Editor which is a platform where you can change the group policies accountable for several backdrop operations in your system. Go through the guideline mentioned in steps below:
Step 1. Press “Windows + R” to open the “Run” mini dialogue box.
Step 2. Type in “gpedit.msc” and hit “Enter”. This will automatically open up your Local Group Policy Editor.
Step 3. Navigate down the following pathway:
Computer Configuration> Windows Settings> Security Settings> Local Policies> Security Options
Step 4. Look out for policy named “Accounts: Administrator account status” and double-click on it to open the properties windows.
Step 5. Go to the “Local Security Settings” tab, and select “Enabled” option to enable the admin account.
Step 6. Similarly you can select “Disable” option from the same location to disable the admin account.
Method #3: Enable and Disable the Built-in Administrator Account in Computer Management
Now we would implement computer management operational window to bring about the change. It is also a platform like Local Group Policy Editor where you can alter the computer’s internal software configurations very easily. Just carry on with the steps instructions accurately mentioned below to avoid any mistake:
Step 1. On the main desktop screen, press “Windows + R” to launch the
“Run” dialogue box. Enter “comptmgmt.msc” to open up the “Computer Management” operational Windows.
Step 2. Go to the following location:
System Tools> Local Users and Groups> Users
Step 3. Locate a sub-key named “Administrator” in the right hand side pane and double-click on it.
Step 4. Go to the “General” tab and uncheck the “Account is Disabled” checkbox and click “Ok”, your account will be enabled.
Step 5. Similarly, check the “Account is Disabled” checkbox and click “Ok”, the account will be disabled instantaneously.
Conclusion:
All the aforementioned 3 methods are carefully chosen out of many other methods to make your experience easier and user-friendly with computer if you are a beginner with system configurations.
But if you wish to know more about Windows and its various operations in great detail, feel free to visit our official website anytime.