
Rooting an Android phone is one of the most exciting things a new user could attempt, but it is also fraught with risk. It’s not something you want to try on a new device like the Samsung Galaxy S10. Please be warned that there are several nuances to this process, so if this is your first time rooting a device, it’s better to stay away until there’s an easier method. Nevertheless, if you are intent on rooting your S10, S10e or S10+ running on the Exynos SOC, there is now a way to do it.

About Magisk
Magisk is a rooting and device customization utility that offers a solid alternative to the ubiquitous SuperSU. Instead of actually modifying your system files on Android, Magisk stores the modifications within the boot partition. That means the modifications can’t be detected by Google SafetyNet, so it won’t block the normal functioning of apps like Netflix and Pokemon GO, to name just two. In contrast, using SuperSU will trigger SafetyNet and block these apps, which is why users are slowly switching to the “systemless” rooting that Magisk offers.

Understanding the Risks
There are risks when attempting to root any device, but with the Samsung Galaxy S10, the risks are far greater because Magisk is installed directly into the recovery partition of Galaxy S10. That’s not how rooting generally works so there’s an inherent risk right there.
The second point is that Samsung brought in VaultKeeper with this particular device. That means the bootloader will be locked every time you do a wipe, which is why after unlocking the bootloader the first time, you’ll have to go through the setup process again to see if the bootloader unlocking is still available.
The third risk is that you’ll have to boot Magisk to recovery every time. Also, since Magisk is installed in the same partition as recovery, how it boots depends on how long the Volume Up button is pressed when booting.

Now that the basics have been covered, let’s look at the actual process. And make sure backup Samsung Galaxy S10 before proceeding to the actual steps.
How to Root Samsung Galaxy S10 with Magisk
Step 1: Go to Developer Options > OEM Unlocking and allow it.
Step 2: Switch off Galaxy S10, then hold down the Bixby and Volume Down buttons, after which you will need to connect the device to a PC in order for it to boot in download mode.
Step 3: Press and hold the Volume Up button to unlock the bootloader and wipe all your data. The system should reboot on its own.
Step 4: At this point, the bootloader is not actually unlocked because VaultKeeper hasn’t officially permitted it. Go through the setup again, but skip everything except connecting to the Internet.
Step 5: Enable Developer Options, then see if OEM Unlocking is grayed out but still exists. This is when VaultKeeper releases the bootloader – after it confirms this information. Your bootloader is now unlocked fully, and you can proceed with Magisk.
Step 6: You can now download the firmware for S10 on desktop and unzip it. Now copy the tar file, which looks like this – AP_[device_model_sw_ver].tar.md5 – and put in on your device.
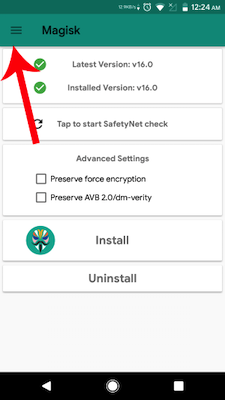
Step 7: Go to the Canary Channel and download Magisk Manager. Open Magisk Manager, go to Install > Install > Select and Patch a File, then patch with the AP tar file on the device. The firmware file will be patched with the tar file and save the output here: [Internal Storage]/Download/magisk_patched.tar.
Step 8: This file can now be copied to your device, after which you can boot the S10 to download mode, as shown in Step 2 above.
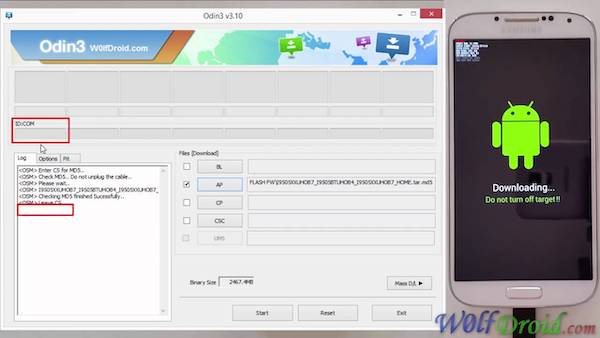
Step 9: In ODIN, flash the tar file as AP, but be sure to go into Options and uncheck the Auto Reboot option. This completes the installation of Magisk to your Galaxy S10 device, but the process is not yet over.
Step 10: Factory reset the device by booting into stock recovery. To do this, exit download mode by pressing the Power and Volume Down buttons. When the screen goes off, again press the Power button, Bixby button and Volume Up button to boot to stock recovery. That means holding the Volume Up button and releasing it only when you see the stock recovery screen.
Step 11: Navigate to and select Wipe Data/Factory Reset in the stock recovery menu to wipe your device. This is an important step so don’t skip it.
Step 12: Select Reboot System Now, and hold down the same three buttons. But this time, release all the buttons together instead of holding down the Volume Up button so it can boot to the system with Magisk.
Step 13: You’ll see that your Samsung Galaxy S10 automatically reboots when you boot with Magisk the first time. Go through the initial setup with an Internet connection and you should now be able to see Magisk Manager in your app drawer. Launching it requires additional steps, for which the instructions will be provided in the app.
You can now enjoy your rooted Samsung Galaxy S10 device! If the root failed and cause data loss, then you can recover the deleted files with TunesBro Android Data Recovery.