Accidentally deleting files or folders in Windows 10 is a nightmare for any user out there. If you are now in this particular situation, there is a good chance that you'll end up losing your precious data. While erasing a file is a straightforward task, recovering it is a different story. In reality, you can retrieve a deleted file in Windows 10, but the process involves editing the registry, which puts your computer at risk.
However, there is a simple way to prevent someone from deleting a file or folder in Windows 10. All you need to do is to change some settings. This should come in handy for those users who are not very tech-savvy. In this tutorial, we are going to show you how to protect a folder from being deleted in Windows 10. Before we get started, we recommend you have the latest Windows 10 update on your machine.
#1 Modify Security Permission to Prevent File or Folder from Being Deleted
One of the most common ways to stop anyone from erasing your folders is to change certain security settings. However, one major drawback is that you can not use this method to lock multiple files at the same time.
Step 1. Select your desired folder on your computer and then right-click on it.
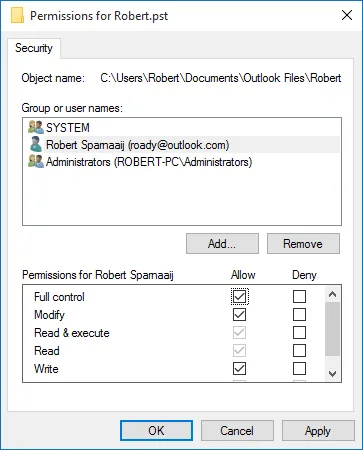
Step 2. From here, select Properties and then select the Security tab. After that, click on Edit under the Group or User name section.
Step 3. Now, hit the Add button, then type Everyone into the input field, and hit OK. Once you are done, go back to the Security tab, then check the box next to Deny for Full Control option.
For multiple files or folders, you have to do this one by one. Another issue with this method is that you don't know which file or folder is protected for access control as there is no sign or mark to identify those samples. However, this is can be solved by using third-party software.
#2 Use Premium Software to Prevent File or Folder from Being Deleted
If you are a big fan of third-party solutions, then give TunesBro Folder Unbreak a try. In reality, TunesBro is a big name in the industry, providing a reliable tool for password-protecting your folders.
Basically, it has built-in function to protect a file from being deleted, copied, modifited or renamed. It can also add password to any file or folder on your local disk, thus preventing other users from accessing data without permission. However, one major downside is that some premium features are locked behind the paid version, which includes the ability to filter out system files that you can not lock.
Pros of TunesBro Folder Unbreak
- Prevedent file or folder from being deleted, copied and edited.
- Bulk option available for file protection.
- Simple user interface with powerful features.
- Add password to file or folder.
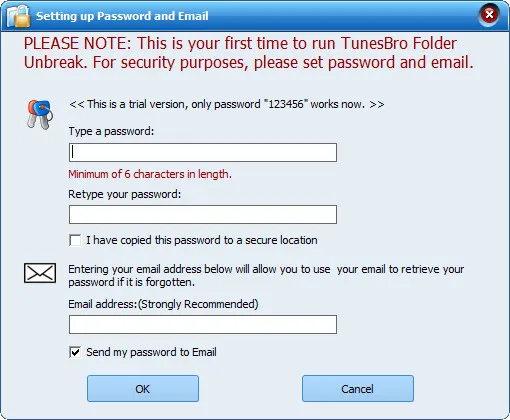
Step 1Install TunesBro Folder Unbreak and Set Password
You can download TunesBro Folder Unbreak from here and then open it on your computer. Before going to the main window, a master password should be set for access control. Each time the program is launched, you need to input the password first.
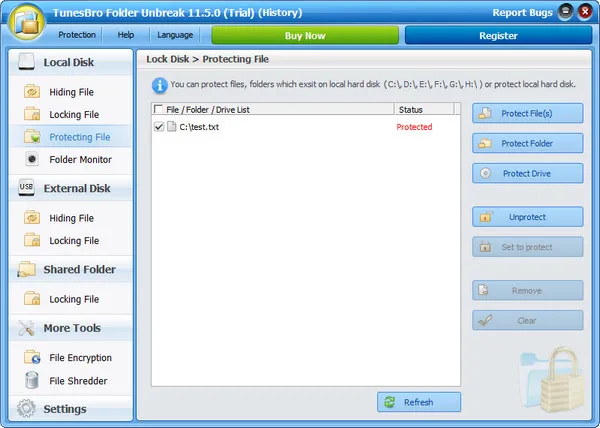
Step 2 Add File or Folder for Protection
From the main UI, you are now presented with multiple options, including Hiding File, Locking File, and Protecting File. Just simply select Protecting File at the left sidebar and add the file or folder you wish to prevent from being deleted. Once the operation is done, it shows the target file is protected under Status column.
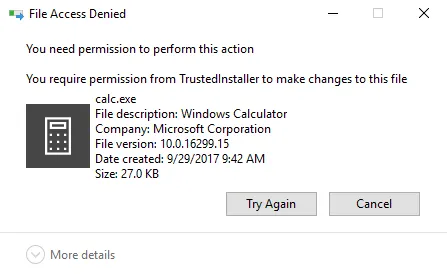
Step 3 File Access Denied
When the file or folder is protected by TunesBro Unbreak, anyone who tries to delete, edit or rename the file will receive the following message. It means the operation failed due to file protection.
You can add multiple folders or files at the same time and you can see the file name on the screen. If you decided to unprotect the files, then it is easy to do this by click "Unprotect" button at the right side.