Duplicate files can take up a lot of space on your Mac without noticing about it. Downloading content more than once, auto-downloading app content, receiving files or photos that you already have and many other things can clog up your memory. This not only slows down your system performance, but it makes your folders highly disorganized so it's hard to find what you need when you're in a hurry.
Is there a way to find and remove duplicate files on your Mac? Yes, there are several ways, actually. Here, we outline three different methods to locate and delete duplicates files and folders from your Mac computer.
- Part 1. Find and Remove Duplicate Files via Spotlight
- Part 2. Auto-Locate and Remove Duplicate Files via CleanGeeker
- Part 3. Find Duplicate Files on Mac by Using Finder App
Part 1. Find and Remove Duplicate Files on Mac via Spotlight (Know the File Name)
If you already knew the file names of possible duplicates, you can use this method. It's easy, but not quick. If you have a ton of duplicates you obviously won't be able to remember all the file names. In such cases, we recommend Method 2 below. But if you only have a few files that you know have duplicates, use this method to locate and remove them.
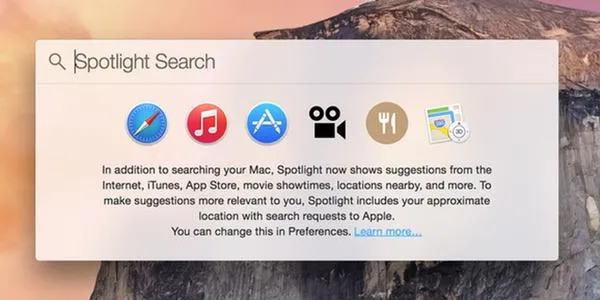
Step 1. Open a new Spotlight search. It can be accessed by clicking Alt+Spacebar.
Step 2. Type in the name of a file. If there's a duplicate with the same file name it will show up at least once in search results. You can then delete the duplicates and only keep the original one.
Step 3. Repeat Step 1 and Step 2 for all subsequent searches.
As you can see, the process is very time-consuming if you have a lot of duplicate files. Besides, if you gave the duplicate file a different name when saving it, then you obviously won't be able to find it this way. If you want to save time and make sure you clean up all duplicate files, then Method 2 is recommended.
Part 2 : How to Automatically Find and Remove Duplicates on Mac
TunesBro CleanGeeker is a robust desktop application for cleaning up your Mac. This powerful software will deep-scan your computer and identify all sorts of junk and duplicate files that are taking up valuable space on your system. You're see a marked difference in performance once you use this app to do a complete spring cleaning of your Mac.
Apart from being able to clean up your junk files and duplicates, CleanGeeker can securely shred your files (virtually) so no trace remains, optimize your computer's memory, remove apps and all data remnants and a host of other functions. It's no wonder that this app is so popular with Mac users around the world. Give it a try and you'll never need another app to keep your Mac running like new.
Highlights of TunesBro CleanGeeker
- Identify all duplicate files in less than one minute.
- Get tons of free space by removing the junk files.
- Uninstall install third-party Mac app in one click.
- Erase files permanently from hard drive. No possible for recovery.
Step 1Download and Run TunesBro CleanGeeker
Please first download TunesBro CleanGeeker from the official site and install it on your Mac. Then open the program from Launchpad.
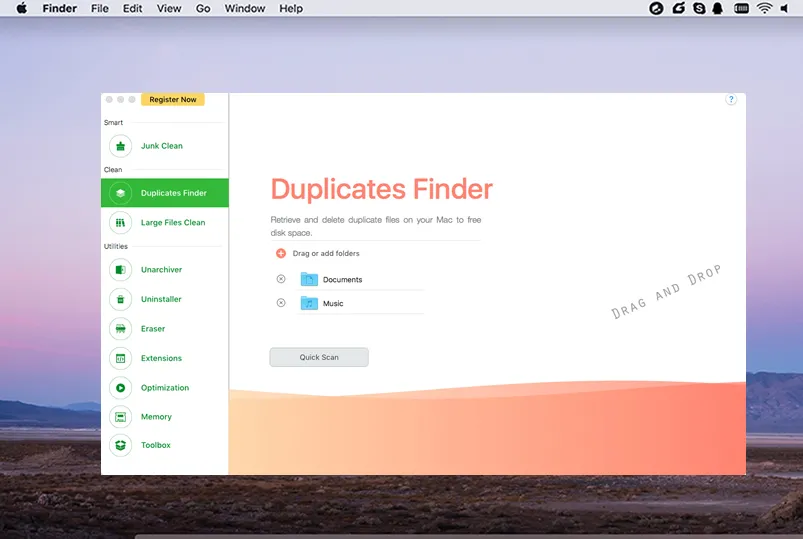
Step 2Find "Duplicate Clean"
Launch the app and click on the "Duplicate Clean" tab on the left panel.
Step 3Add Target Folders to Remove Duplciate Files on Mac
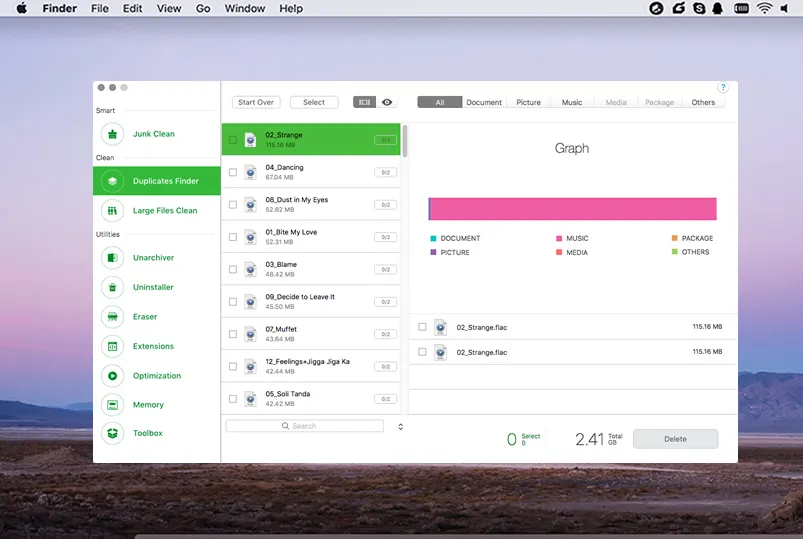
You will now be able to see a categorized view of duplicate files next to the left panel, and the file themselves on the right-side window. The duplicate files will already be selected for you. Just review the full list and then click on 'Delete' to remove these files from your computer.
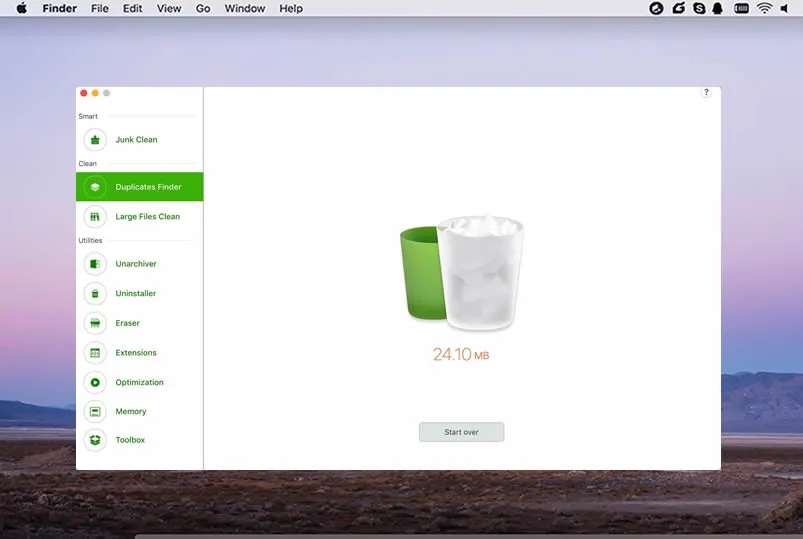
You can also clean up large files, remove apps, clean junk files and execute several other tasks once you're done removing duplicates. This should speed up your Mac considerably.
Part 3. How to Locate Duiplicates on Mac with Free Duplicate Finder
This method involves getting on your knees and getting into your drives and folders through the Finder app. Roll up your sleeves because you will have to go into each drive, folder and sub-folder to look for and remove duplicates. These steps below will help you do it right:
Step 1. Open Finder and go to the root directory on your hard drive. From there, you can either do it by user if there are multiple users, or do it by content type. For example, you can go directly to the "Movies" folder and search for duplicate media files there.
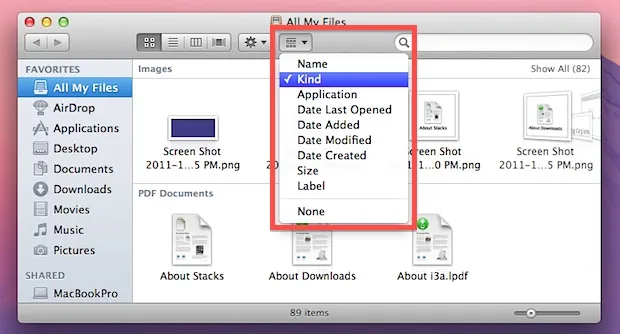
Step 2. To make things easier, you can assign a different order to the displayed content in Finder. Go to a folder, then click on the gear icon in the toolbar. From there, mouse over "Arrange By" and then choose "Name" for alphabetic duplicate detection. You can also choose "Kind" to search by file type, "Application" to sort by which apps created the content, or even just "Size" to arrange by file size.
Step 3. Once you have found a good sequence to follow, do the same thing on all other folders. Alternatively, you can select "All Files" on the left panel and then execute Step 2. That way, you won't miss duplicates even if they're in a different folder.
This is a thorough way to clean up duplicate files, but unless you're super-organized and extremely meticulous, you may not catch everything. Besides, your eyes will probably hurt by the time you're done.
Conclusion
If you have been using your Mac for a long time without doing any sort of file clean-up, we recommend Method 2. It's quick, convenient and very thorough, and you can have your computer running like new in just minutes after installing the software.