
If your laptop hard drive has just stopped working, it will be a highly frustrating thing. You might have managed to do something to save it if the drive still makes screeching sounds. But, if it is just dead or broken, you will definitely worry about the data that you have not backed up yet. Just do not fret and carefully evaluate the hard drive for any damages, try replacing the cables in case you have IDE/EIDE drive. Or switch drive pin settings.
Besides these things, you can also opt for other IDs or another PCI controller and can attempt once more, if nothing happens. You can also try to get back your hard drive to life by connecting the same into another peripheral drive adapter like USB. Finally, you can also connect the drive to another computer and can try again. If nothing seems to happen and even without trying out these things on your own, the best thing you can do is look for a tool to safe recover the files from that dead or broken hard drive.
TunesBro DiskGeeker, as the name of this data recovery tool very well denotes, helps you retrieve deleted files from all types of hard drives, including IDE, SATA, SSD and SCSI. This means you can recover the files from laptop computer based on the supported hard drive type. Plus, DiskGeeker can also recover all kinds of files from the hard drive, support list is shown in below.
Computer Brands: Dell, Lenovo, HP, Samsung, Acer, Asus, Toshiba and others.
File Type: Photos, Music, Video, ZIP, RAR, Word, Excel, PowerPoint, Emails and more.
User Guide : How to Recover Missing Files from Dead or Broken Laptop Hard Drive
Step 1Install TunesBro DiskGeeker on Computer
The first step is to download and install TunesBro DiskGeeker on the computer. If there was problem installing the program, then you should run the .exe as administrator. When the installation is finished, please launch the program and you will see the main interface like this:
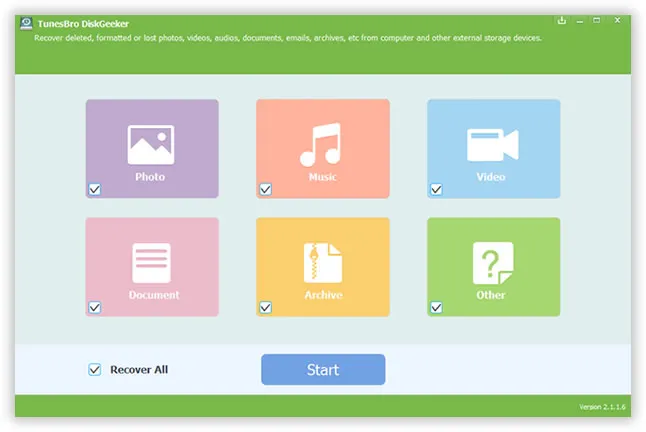
Step 2Select File Type and Drive Name You Wish to Recover
The main file type is listed on the startup window, kindly select the file type you care about and click the Start button. Or you can select all if you need to recover all the files on that hard drive.
Next, choose the drive name that the important files are stored. However, you still have chance to select the whole hard drive. The more drives you select, more time will be taken for scanning.
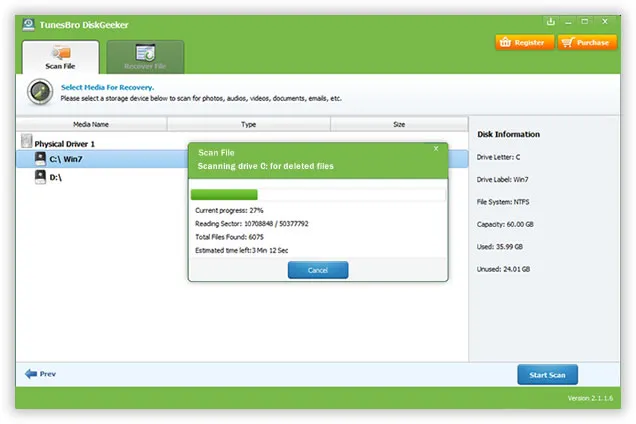
Step 3Scan Deleted or Lost Files from Selected Drive
After drive selection, click Start Scan button to start the file scanning process. TunesBro DiskGeeker will try its best to find all the lost files on that hard drive by using the most intelligent recovery algorithms. Please be waited unless the scanning is completed. This usually takes more than 10 minutes.
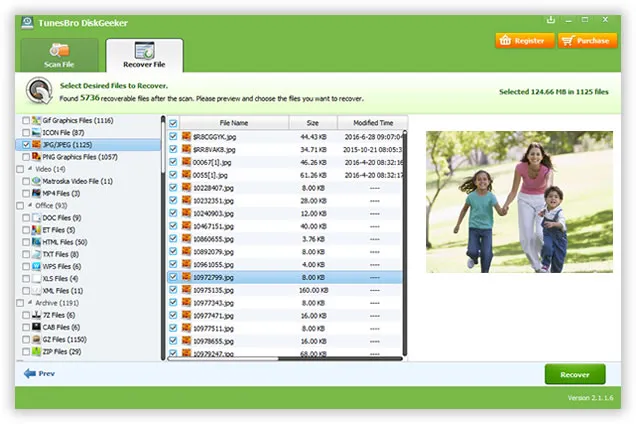
Step 4Preview and Recovery Files from Laptop Hard Drive
All scanned files will be listed in categories, which you can see from the left sidebar. Click the category name to see all the files in it. You can preview the file one by one. If it was the one you are looking for, then don't forget to mark it. After selecting all the files you hope to restore, click Recover button to save them on the computer.
There are hundreds of data recovery applications sold in the market, but no one would support the file types as many as TunesBro DiskGeeker. Literately, you can recover all normal files types stored on a hard drive. This is something attractive and once you get this application to your Windows PC, you can use it for further data recovery on other storage devices, too. So there is no need to worry about data loss of hard drive.
Related Articles & Tips
-
Recover Data from Dead or Broken Hard Drive
![[Solved] Recover Data from Mac](images/data_recovery/mac-recovery-2.webp)
- HOT ARTICLES
- • Recover Deleted Files from Computer
- Recover Formatted Data from Hard Drive
- How to Recover File from Mac Trash After Empty
- • How to Undelete Mac Files
- Recover Data from MacBook
- • Restore Data from an IDE Hard Drive
- • Restore Lost Files after Windows 10 Update
- • How to Retrieve Deleted Documents from Mac
- SSD Data Recovery
- • Recover Files from Formatted SD Card
- • Recover Deleted Photos from Camera Memory Card
- • USB Data Recovery
- • Recover Deleted Video from Camcorder
- • How to Recover Files from a Pen Drive
- • External Hard Drive Recovery In Simple Steps
- • Recover Data from Seagate External Hard Drive
- • Western Digital Data Recovery
- Useful TIPS