iOS upgrades often lead to problems for iPhone users. Some of the more common errors are iPhone stuck on Apple logo, stuck in recovery mode loop and stuck on black screen. But there are several other issues that cause the device to hang, especially during or immediately after an iOS update or after a factory reset.
The easy ways to deal with such problems are to restart your phone, hard reset it, reinstall iOS and so on. But what if none of these DIY methods work for you? Will you be forced to take your device into an authorized service center, or are there specific tools you can use to recover your iPhone and get it back to normal? Thankfully, there are. But first, let's cover the tried and tested methods that work for a lot of people. Note that this first group of methods only have a 50-50 chance of fixing the problem. However, you can try them just in case one of them happens to resolve the issue. The second method described below is a lot more comprehensive, and it can deal with nearly every single iOS system recovery issue you can think of - and a few that you don't even know exist.
Quick Fix 1: The Usual Way to Fix iPhone Stuck on Slide to Upgrade Screen
There's a short list of things you can try to restore your device to its original state. Here they are:
Try restarting the device: : In older iPhone models, hold the power button until you see the "Slide to Power Off" message. If that appears, slide it and then start up your device to see if the problem goes away. On newer devices like iPhone X, you'll have to quickly press the volume up and volume down buttons in succession, and then press and hold the side button until you see that message.
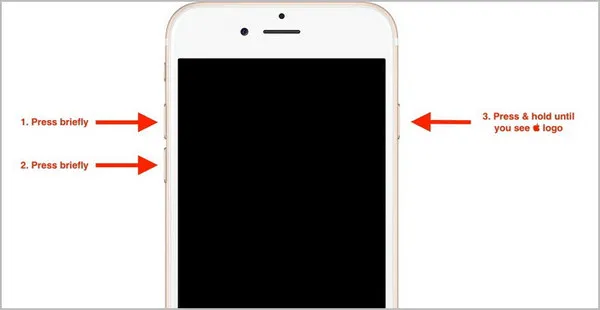
Try a hard reboot: This is also different in newer models, but the general method is to hold the side and home buttons down simultaneously until you see the Apple logo. Then release both buttons and let it boot up. On other devices it will be the side and volume down buttons; on iPhone 8, 8 Plus and X, follow the steps to restart, but hold down the side button until you see the Apple logo.
Try an iTunes reset: : You can also hook up your iPhone to a PC running the latest iTunes version and then on the Summary tab for your device, click on "Restore iPhone". This should work in most cases.
Try Putting the iPhone in Recovery Mode: : This is not an option for the faint-hearted. You won't have the chance to do a backup, and the mode itself bypasses some of the protection built into the device. If you must do it, then connect your device and follow the steps as you did with the hard reboot. But this time, keep holding the side button down until you see the "Connect to iTunes" message on the device and a corresponding prompt on iTunes to "Restore or Update" the connected device. This takes a while, and then you need to set up everything again like you did when you first got your iPhone. Unfortunately, you could lose some or all of your data in the process.
Quick Fix #2: The Easy Way to Fix iPhone Stuck on Slide to Upgrade
There's a powerful iOS-specific software called iOS System Repair from TunesBro that can take care of all these issues quickly and safely. Rather than fuss around with multiple methods that only have half a chance of fixing the issue on your device, it's probably better to rely on a trusted application that has millions of iOS users vouching for it.
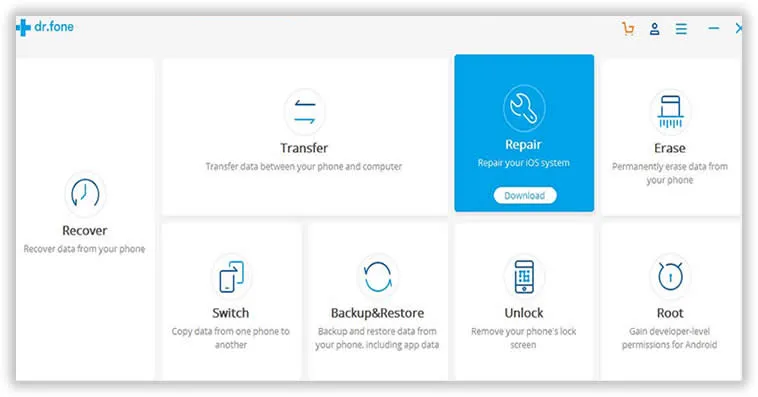
The Repair module is part of a complete iOS System Recovery toolkit that contains functions like Backup & Restore, Transfer, Erase, Unlock, Switch and Recover. The software is extremely intuitive for new users, and you can get your iPhone back to normal in no time. So, if you prefer saving time and getting the job done right the first time, follow the steps below:
Step 1 Install iOS System Repair and Connect iPhone
Download the program from the official site and install it on your computer. Launch the application and then connect your iPhone to the computer with your lightning cable. On the interface, you'll see your device automatically identified, as well as several options, as mentioned above. Choose the "Repair" option.
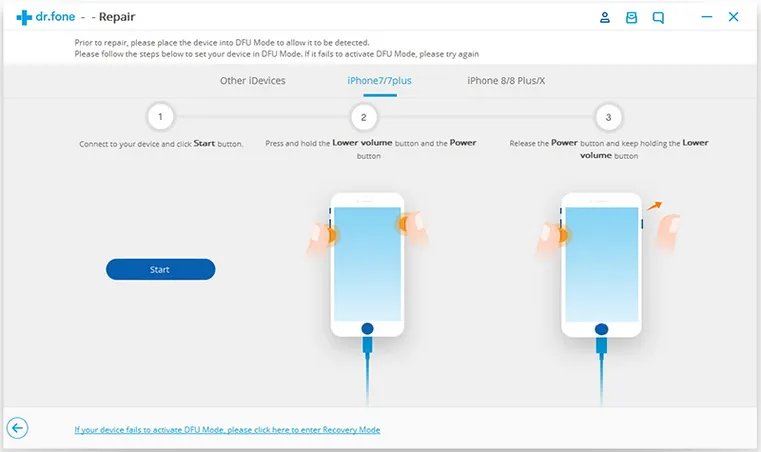
Step 2 Put iPhone in DFU Mode
Click on "Start" in the next window, and this will display your device details. At this point, click "Next". Now put your device into DFU mode. Instructions on the software interface will show you how to do this for your particular iPhone model. Newer phones differ slightly.
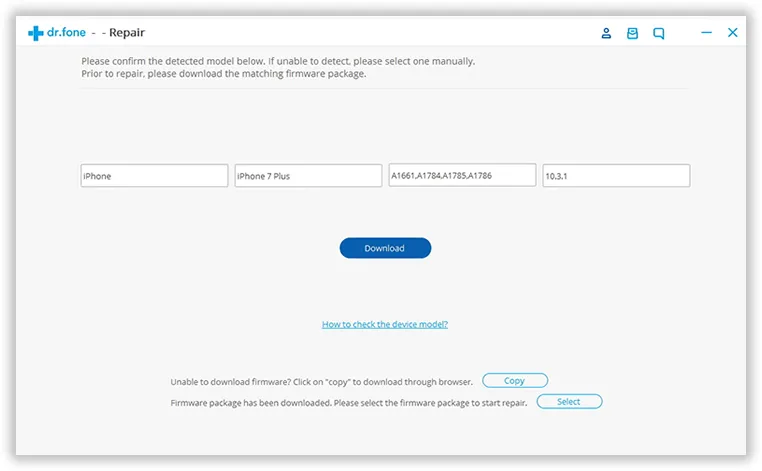
Step 3 Download iOS Firmware
The next step is to choose and download the right firmware for your device. This will be the latest iOS version currently being signed by Apple. If you have any trouble, there are help resources on the same page that you can click on. Click on "Download" when you're ready.
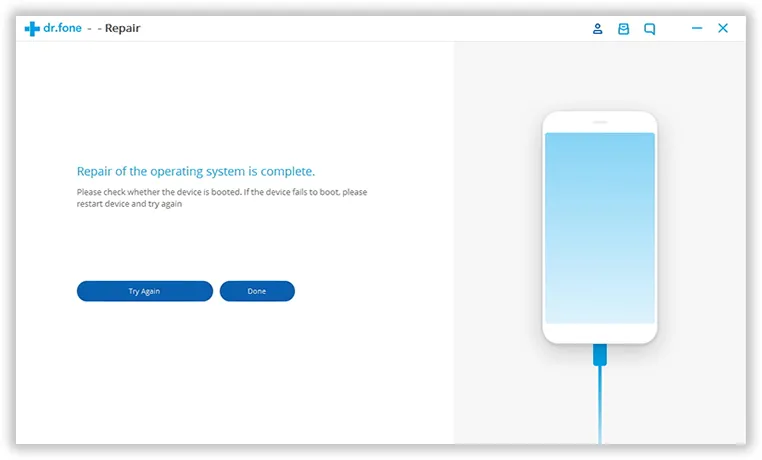
Step 4 Fix iPhone Issue
Once the firmware has been downloaded, you'll see an option called "Fix Now". Click on that and it will repair your device to its former state, and with the latest signed iOS version.
The Verdict:
And that's all there is to it. No fussing with iTunes or being scared of losing any data. This software utility doesn't touch any of your data, so whatever you have on the device will remain there. If you want to be double-sure, then simply use the Backup & Restore module to first create a backup file, which you can restore later to the device if you need to.