It happens quite often in our daily life that we need to compress a large file or archive a folder in zip format. This would dramatically reduce the file size so the upload and download time would be minimal if it was shared or sent via email. Unlike Windows, Apple doesn't provide any app for zipping or unzipping file on Mac so we need to do it in our own way.
Part 1. What's ZIP?
Before there was even an ISO file or ISO image, people have been using zip as a means to compress files and folders. It is a very convenient way to optimize the storage space of a computer or device. In fact, you can include a number of files in a single zip archive and you don't need to worry that it will take up too much space.
It is because of those things that the zip format is commonly used when there is a need for file compression. However, only a few knows how to extract a zip file on a Mac device. Mac doesn't readily support files with zip format. That is the reason why zip files normally can't be extracted by using a Mac device.
Nonetheless, there are ways to get around it. There are actually special archiving tools that can be used to extract the content of these zip files. Below you will find two useful tools that you can try to zip and unzip files on your Mac. Before that, let's discuss the benefits of compressing files using the zip format.

The Advantages of Compressing Files using Zip Format:
- Much easier to organize and store files if you compressed them in a zip file. For files that you don't currently use, it is also better to keep them archived inside a zip file. This way, you can conserve space and it will help eliminate the clutter in your folders.
- Easily send them to other people through email. Email servers usually can't process large files. So, if you compress the files first before sending them, it can ensure that you will be able to send it successfully to its intended recipients.
- By having the files compressed in zip files, you will be able to add more things inside a CD or USB flash drive. Plus, since it is much smaller in size, the process of transferring the files will be much quicker.
Part 2. How to ZIP File on Mac via Terminal (Compress Large Files)
Terminal is a one of Apple's application that offers text-based access that allows users to input simple and complex commands to both Mac OS X and macOS systems. Although it is quite overwhelming, using command line is not that hard once you're familiar with it. However, things can get out of hand if ever you input the wrong commands. So, those who lack the technical skills and knowledge must approach this with extreme caution. If you would like to give it a try, however, here are the steps you should follow:
Step 1. Save the zip file to your preferred location.
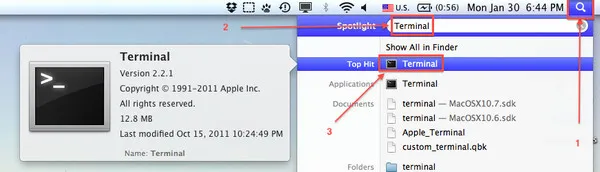
Step 2. Launch the application by going to Utilities under Applications and selecting Terminal.
Step 3. Modify the directory where the zip file is saved. Type "cd ~/users/username/desktop" and hit Enter.
Step 4. Ensure that the file location is correct. Then, use the command "zip -r file_name.zip folder_to_compress" to zip a folder and save the compressed files in a folder with the same location. A new folder will automatically be created in your preferred location and will include the extracted files from the zip file.
Part 3 : How to Unzip a File on Mac with CleanGeeker
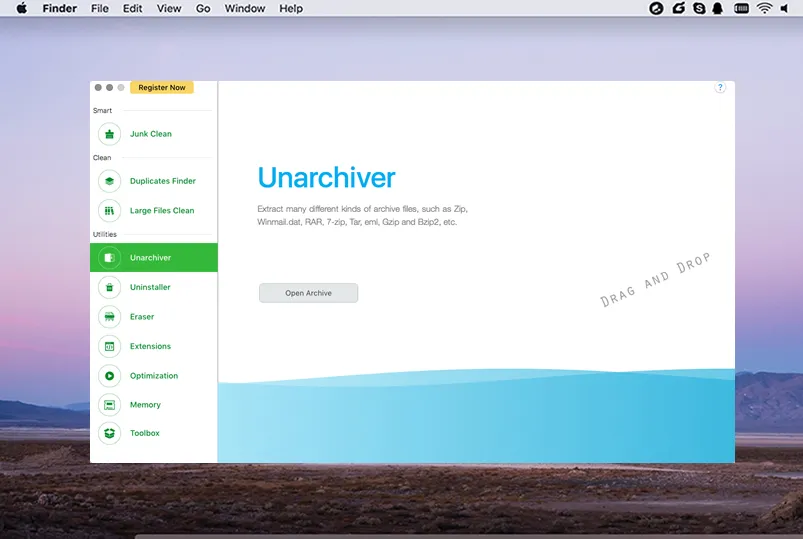
Most of the users are not comfortable with commands. Mac is famous for its elegant UI. So it is more welcomed to use a GUI app to zip or unzip a file. So in here, we recommend TunesBro CleanGeeker, a tool that can help you optimize the capacity of Mac devices by handling its junk files and memory resources. It also offers other features like file extraction being trusted by many users for extracting ZIP files, RAR, and other compressed files. Plus, the tool's interface is very intuitive and only needs a drag and drop gesture. To start extracting your zip files, please follow the steps below.
Highlights of TunesBro CleanGeeker
- Extract zip files with GUI.
- Optimized Mac performance.
- Scan and remove junk and caches data on Mac.
- Delete malware or virus app from Mac.
Step 1 Download and Run TunesBro CleanGeeker
Download and install TunesBro CleanGeeker on your Mac device. After successfully installing the tool, proceed to launch it.
Step 2Add ZIP File and Unzip it
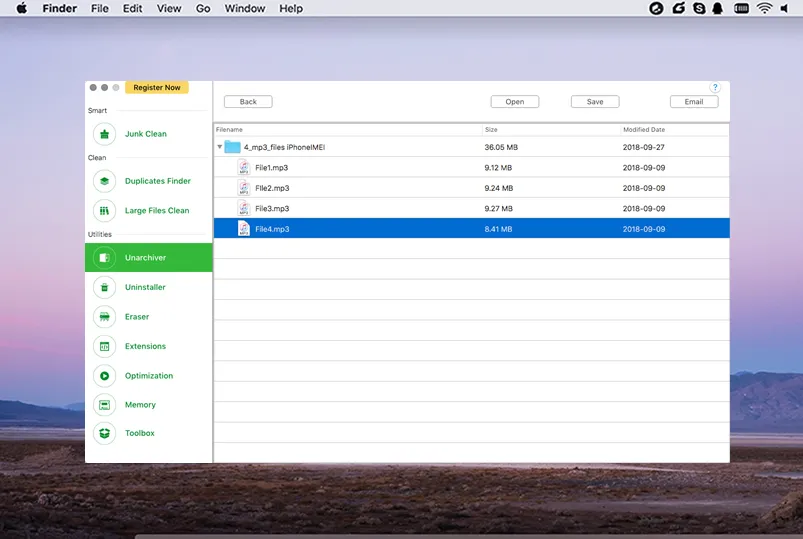
Click on the "Unarchiver" option located in the left part of the menu panel. Drag and drop the compressed file into the window from Finder. You also need to click on the "Save" option to extract the archive to Mac hard drive.
Summary:
If you want a tool that can offer simplicity, then TunesBro CleanGeeker is the right one for you. With CleanGeeker, you don't need to enter any command line or make use of any complex settings. You can access a powerful tool but without the complexities that other tools have.