If you are getting the omen of running out of hard drive space on your Mac, then you must not sit idle taking it to be a casual note of a usual ordeal. Quite often when you use your system, you forget to keep it in perfect shape and operational stature, and store relentlessly everything you get in hand. The most coagulating factor of all to run out of storage space is the collection of a lot of large sized files, which could be some unwanted software files, folders, etc.
You need to be aware of them before you can actually clear out of your system. And that is what we are going to take up as a challenge in this article. We would find ways to locate or find large sized files on Mac since only then will you be able to remove them from your machine.
- Part #1: Find Large Size Files Manually Based on File Size
- Part #2: Find and Remove Large/Old Files on Mac with using CleanGeeker
- Part #3: Find Large Files on Mac using Disk Inventory
Part #1: Find Large Size Files Manually Based on File Size
Here in this method we would not make use of any third party tool rather would depend upon the spotlight locating feature which is a core feature of MacOS. So how does it work?
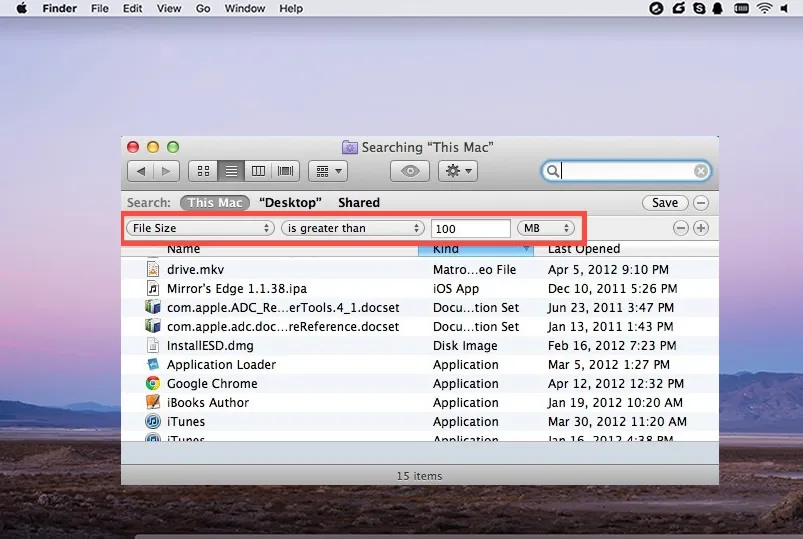
Step 1. First of all, open any new finder window and then press "Command + F" key combination to open up the search field.
Step 2. Next; click on "Kind" filter and then "Other" option. Choose the "File Size" from the attribute list.
Step 3. Now click on the second filter and select "is greater than" option. Enter the size in the third field for files greater than the size 100 and select the size in GB or MB from the last filter in the row.
Step 4. Any large file that is loaded in the hard drive will appear in the below panel. It is recommended to check the "This Mac" sign in order to make sure you don't only get the limited results. Additionally, you need to operate every single folders and sort them by the size. This option is totally customized and will work according to your requirement.
Step 5. Now if you want to look always for large sized files only for the time being, then you can also make the filter parameters set for locating large files permanent by clicking the "Save" button in the upper right corner of the screen.
Also read: How to Find and Delete Duplicate Files on Mac
Part #2: Find and Remove Large/Old Files on Mac with using CleanGeeker
TunesBro CleanGeeker is one of the famous Mac cleaning tools which have been gallantly ripping off other available tools lately with huge preference and positive feedbacks from user across the internet. It's great all-in-one Mac cleaning program which can flexibly optimize your Mac's performance and monitor the system space status. CleanGeeker let your preview all the folders in your Mac in their respective categories and let you see how much space it is taking. You can then erase the folders that you do not require anymore. It is extremely easy to run, all you have to do is select the hard drive that you wish to scan and within minutes you will have the information of all the large files in the Mac that are wasting the disk space on the computer.
CleanGeeker - Find and Delete Large Size Files on Mac with One-Click
- One click to deeply scan and delete all kinds of files, large files, duplicate files, junk files and cache files etc.
- It can monitor and optimize your Mac including CPU usage, battery usage, etc.
- It uses RAW searching algorithm that deeply scans every possibility edges of Mac directory.
- It is compatible with all Mac OS versions.
- More other features >>
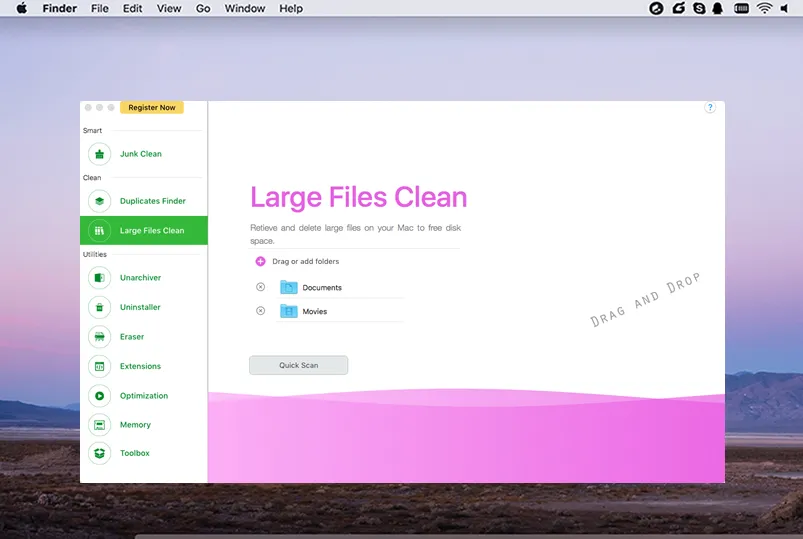
Step 1Download and Install CleanGeeker on Your Mac
Get the software downloaded to any of your operational Mac device and install it. Double click on the icon to open it and from the main interface, click on "Large files Clean" tab from the left side.
Step 2Scan All Junk Files from Your Mac
Follow up a quick scan to gauge the list of large files your Mac is currently storing or you can drop folders from finder into the software interface to let the scanning done.
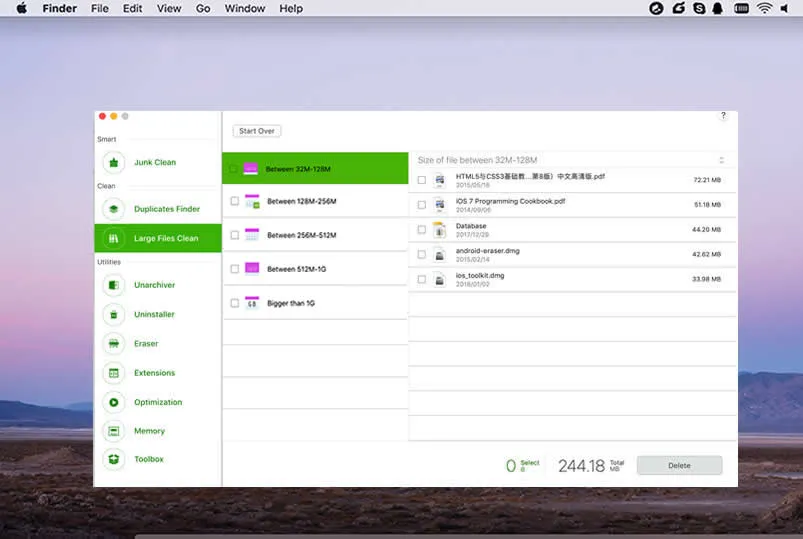
Step 3Start to Delete Large and Old Files on Your Mac OS X Now
Check the files before removing them and then select them, and click "Delete". Confirm the action when prompted.
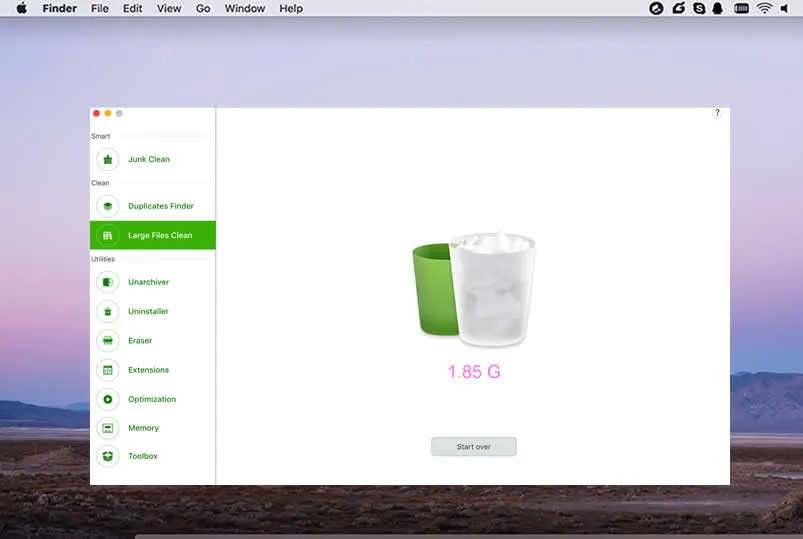
Once you are done with all types of junk file cleaning, you can be rest assured of the proper condition of your Mac now onwards.
In addition to large files, You also are allowed to find and delete duplicated songs on iTunes library.
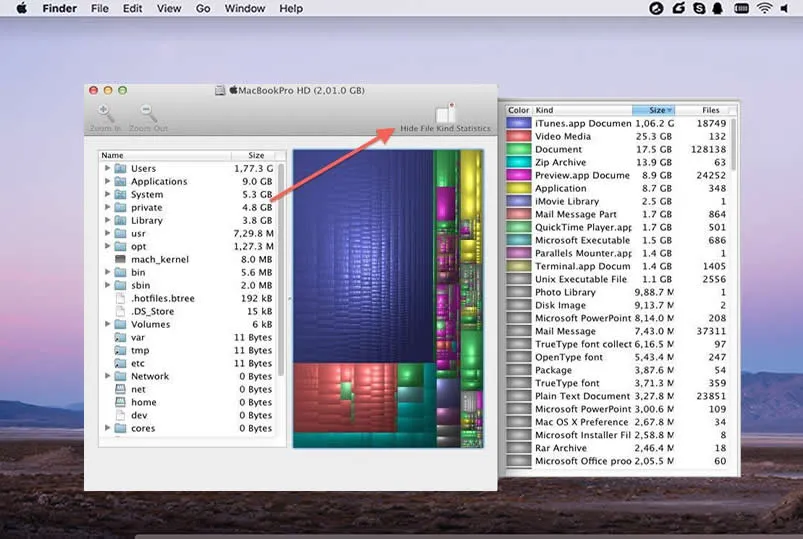
Part #3: Find Large Files on Mac using Disk Inventory
Disk Inventory is a freeware tool specifically designed to visualizing disk space. Using this tool we would scan every corner of the directories to locate large sized files which are unnecessarily taking a lot of your valuable space. In order to put this tool to use, get it downloaded to your Mac and then open the tool. It will automatically show all the drives attached to Mac. Choose any one of them and click "Open Volume" to check out the contents within them.
After the tool is done reading the results of your system, an organized map will be presented with color. Each color would correspond to a particular folder and the percentage shows the space it takes up.
Conclusion:
All the methods would work fine, but you need to ascertain which would be more suitable for you to do the work in time. If you don't have the time to invest for downloading tools, then the first method would be appropriate, but if you need precision in your search, then a third party tool like Mac Cleaner is mandatory for accurate searching.