Most of us know how to clear our browsing history from the Safari browser on our desktop. But there are a lot of people who are still unaware of how to do this on their iPhone, iPad or iPod. There are a number of ways to delete history from your iPhone. Some of them are more effective than others, obviously, so it's a good idea to bone up on the different methods to decide which one is the most suitable one for you.
You have to keep in mind that there are different levels of data erasure. Most of them only remove browsing history from the local device. Others take it a step further and make previous browsing data completely unrecoverable. Let's take a look at three different ways to delete your iPhone browsing history on the Safari Browser app.
- Method 1: Apple's Official Suggestion
- Method 2: From Safari Browser on iPhone
- Method 3: Permanent Deletion with TunesBro iOS Eraser
Method 1: Clear Browsing History on iPhone with Apple Official Suggestion
Apple has laid down certain guidelines and recommendations for various actions that can be taken on an iPhone. In this particular case, Apple suggests that you delete browsing data from the device itself. To do this, copy the steps described below on your iPhone:
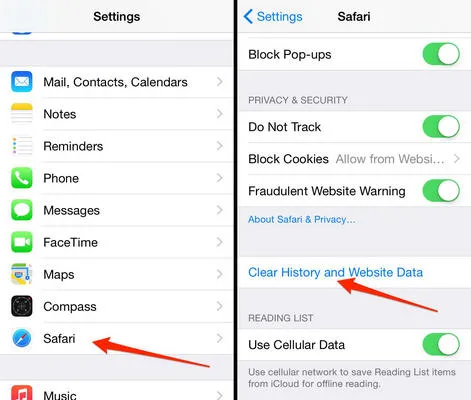
Step 1. Open settings on your iOS device and tap on "Safari".
Step 2. On this page, click on"Clear history and website data".
Step 3. All history and related data (caches, tem files and cookies) will be removed from the device. So be sure if you want remove all data from Safari.
Cons: The deleted history and data will be re-synced to your iOS device once iCloud restore happens. So it is not a permanent deletion. It can be still viewed at other places.
Apple notes that this method will not remove the data that is used for the AutoFill function. It also suggests that if you want to go to websites without leaving a footprint, you can use Private Browsing. To turn on Private Browsing, open Safari on your device, tap on the privacy icon, then tap "Private" and, finally, tap on "Done". Please note that if you engage in Private Browsing, your AutoFill information will not be available. On the positive side, the browser will not store your activity history.
Method 2: How to Delete Safari History from Itself
Another way to clear your Safari browsing history on the iPhone app is to do it directly from within the Safari app itself. This is very similar to the first method described above, but the navigation is completely different since you are going to be doing this from inside the browser. The method is fairly simple, and you should be able to do it in a couple of minutes.
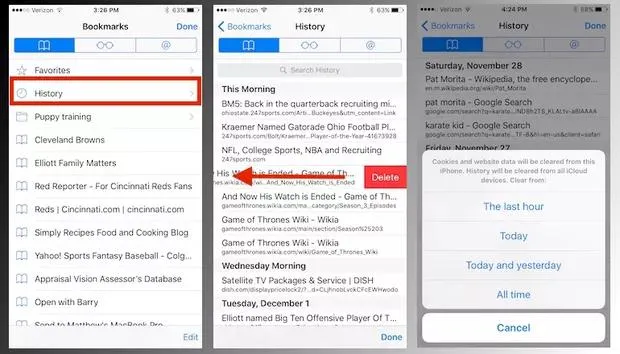
Step 1. Open the Safari app on your iPhone and tap the toolbar where it says "Bookmarks". Now search for the bookmarks icon on the upper left hand side and tap on "History". You will see an option called "Clear".
Step 2 . When you tap on "‘Clear", the app will ask you the time period for the browsing history that you want to clear. The choices are all-time, which is your entire browsing history on that Safari app, today and yesterday, which is the last 48 hours, today alone, which is the last 24 hours, and the last hour. Tapping on the desired option will delete all browsing history from that time period.
The convenience that Apple provides in terms of being able to choose the amount of history to be deleted is a great feature. If you only want to clear what you did right now, you can choose the last option.
Both of these methods make your browsing history inaccessible on the device. But it does not work all the time. In certain cases users have been unable to delete their browsing history using these methods. In most cases, the browsing history can easily be recovered using third-party software. If you are worried about being in that situation, there is a third and more reliable way to delete Safari browsing history on your iPhone permanently and unrecoverably.
Method 3: Permanently Delete Safari Browsing History with TunesBro iOS Eraser
TunesBro iOS Eraser is the ultimate iPhone data eraser. The purpose of this software is to help the user achieve total privacy for their data. When you use this to delete any sort of data from your device, it is 100% unrecoverable. That means, no matter what software you try to use to get back the data, you will not be able to accomplish it. This is true privacy.
The application not only works with browsing data, but any type of data downloaded to or generated by your device. This includes messages, call logs, messenger app chats, media, contacts and so on. This advanced software supports iPhone X, iPhone 8 and iPhone 8 Plus, aside from older iPhone models. It also supports the latest beta version of iOS 12 in addition to iOS 11 and earlier. The ideal use of this software is for when you want to permanently erase data because you are either selling the phone or giving it to someone else, and the company boasts the fact that the data can never be recovered by any hacking tool.
Why Choose TunesBro iOS Eraser
- Deletion is permanent; No chance to recover them at all!
- Easy of usage with simple user interface.
- Free up GB of storage in one-click.
- Wipe iOS devcie completely before selling.
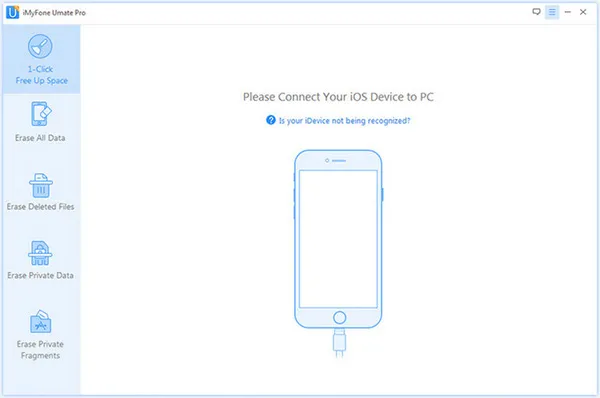
Step 1Install TunesBro iOS Eraser
Download an authentic copy of TunesBro iOS Eraser. You will see two versions, one for Windows and one for Mac OS X. Install it on your Windows PC or Mac computer, then connect your iPhone to the computer and launch the software application.
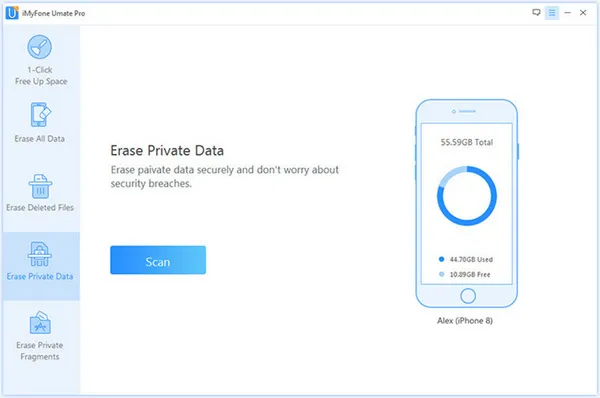
Step 2Choose Data Cleaning Method
On the software interface you will see several tabs on the left hand side panel. The one you need to click on is "Erase private data". Once you have made the selection, click on the "Scan" button and allow the process to complete. It shouldn't take more than a few minutes.
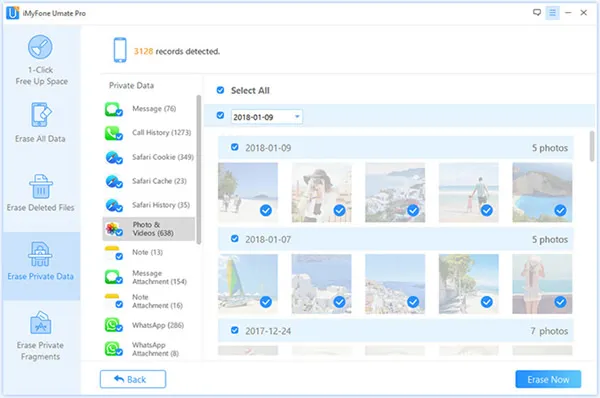
Step 3Delete Safari History from iPhone Completely
Once your device has been scanned thoroughly by the software, the application will show you all the different types of data it has found on your device categorised by type. This includes your messages, call history, photos and videos, and a whole list of other data types. Within this list you will see an option called "Safari History" with a number next to it in parentheses. This is the number of history items that are currently stored on the device. Select that option, then select all the history items to be erased, and click on "Erase Now".
The software will now ask you to choose a security level for the data erasure and request an additional authentication for the data wipe. Choose the appropriate security level after reading the settings, then type the word "delete" in the box provided, and once again click on "Erase Now". With this confirmation, the software will now proceed to erase whatever data you selected in Step 3 above.
Closing Words
If you are still in doubt as to whether or not the data has truly been deleted, you can use any third-party software to hack into your iPhone's Safari app to see if the data is really gone. The company behind iOS Eraser is so confident that the data can never be recovered that they boldly advertise 0% recovery on their website.
All of these methods will help you accomplish the same task but in different ways, as you just saw. If you want to achieve a serious level of privacy with regards to your personal information, then Method 3 would be the obvious and only choice.