It's always exciting when Apple releases a new version of iOS. Most iPhone users rush to update their devices to the latest version, but this can often lead to problems. One of the most common issues when updating your firmware is your iPhone getting stuck on searching. There are several ways to fix this issue, some of which have been covered below.
The one thing you need to realise when you come across the iPhone stuck on searching issue is that all is not lost. There is no need to worry about having to take your device to a service center or anything as drastic as that. You will be able to use one of the methods described below to fix the iPhone getting stuck on searching problem yourself and avoid a trip to the Apple service center.
- Part 1: Reset All Network Settings
- Part 2: Try Force Restarting your iPhone
- Part 3: iOS System Reapairing Software
- Part 4: Restore Device with iTunes
Part 1: iPhone Stuck on Searching for Network? Try to Reset Network Settings
Sometimes, when checking for new firmware, it may be your network that is causing the issue in the first place. In such cases, all you need to do is to reset your network settings to get your phone working again. This does not require any technical knowledge because you will not be changing the settings in anyway, but simply resetting it to the factory defaults.
Step 1: On your iPhone, go to Settings -> General and then go down the list of sections until you see Reset. Tap on that.
Step 2: You will see an option called Reset Network Settings. When you tap on it, which you must do at this point, you will get a warning popup telling you that all your network settings will be deleted and will return to the factory default settings. Tap on "Reset Network Settings" in the popup and all your network settings will be refreshed.
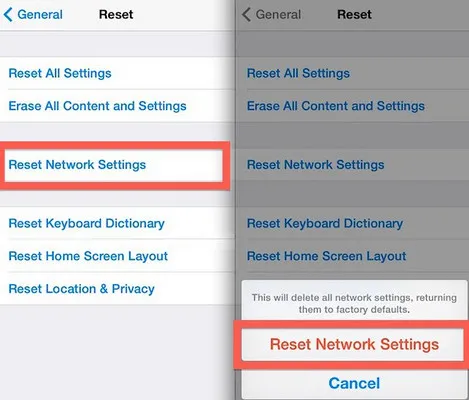
While this operation may help fix the iPhone stuck on searching issue, you should be aware that with it will reset all your WiFi passwords as well as cellular data settings. For this reason, it is recommended that you first note down all your network data details and WiFi passwords so you don't have connectivity issues after the network reset.
Part 2 : Force Restart iPhone to Fix it Stuck on Searching for Service
In many cases, a simple force restart of your iPhone could take care of the iPhone stuck on searching problem. This method works half the time, so there is a 50-50 chance the problem will be fixed using this method. However, since it is the most straightforward method to try and fix the problem, we have described it below.
Please note that the force restart operation is a little different on each of the recent models of iPhone released over the past two years.
For iPhone 6S and eariler: Press down and hold the Home button on your iPhone. Without letting go of the Home button, hold down the Sleep/Wake button. For about 10 seconds, keep holding down both buttons, at which point the Apple logo will appear. Release both buttons together.
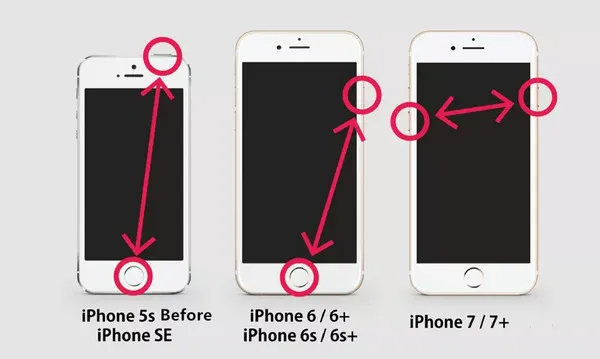
For iPhone 7 and 7 Plus : Simultaneously hold down the Sleep/Wake button and the Volume Down button for 10 seconds. When you see the Apple logo, release both buttons together. If the problem has been fixed, your iPhone will restart normally.
For iPhone X, iPhone 8 and 8 Plus: You need to press the Volume Up button and release it, then do the same with the Volume Down button. Now hold down the Power button on the side until you see the Apple logo, and then release it.
Ideally, this procedure should help fix the iPhone stuck on searching problem. If the problem still persists, however, you can try restoring your iPhone using iTunes.
Part 3: How to Fix iPhone Stuck on Searching Screen with Repair Software
If you really don't want any of the hassles that come with the above two methods, then what you are looking for is a robust solution that will prevent data loss but allow you to quickly repair your device and get rid of the iPhone stuck in searching problem.
TunesBro iOS Repair is a powerful desktop utility to fix most iPhone issues. It will quickly repair your device and allow you to start using your phone again in a short time. The best part is that none of your data will be touched so you don't have to worry about precious files or media being lost forever.
This tool is used by millions of iPhone owners around the world. Apart from supporting the latest stable iOS 11.4, it even supports the beta versions of iOS 12 that is yet to be released. It can help you fix a lot of issues, including iPhone being stuck in a bootloop, stuck on whilte screen, and many other problems faced by iPhone users. The software works on all iPhones starting from iPhone 4 right up to iPhone X. It even works on the iPad series of tablets and Apple's media player, iPod Touch.
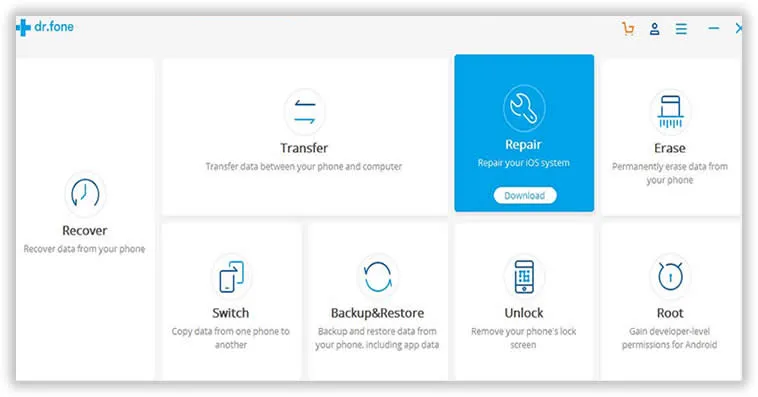
Step 1 Download and Run TunesBro iOS Repair
Download TunesBro iOS Repair and install it on a Mac or PC. Now launch the program and connect your device to the computer. Click on the "Repair" module and go to the next page.
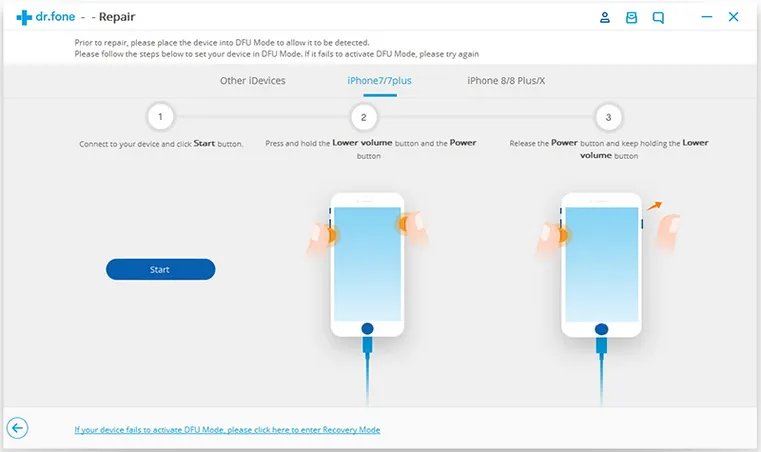
Step 2 Put iPhone into DFU Mode
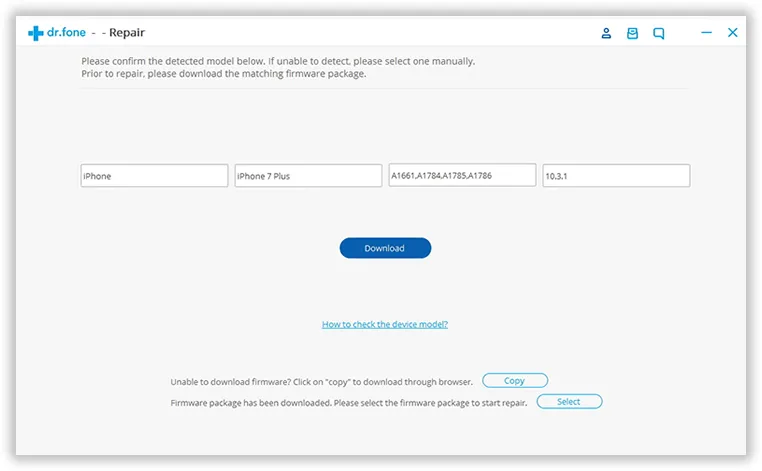
Click on the "Start" option and, in the next window, click on "Next". Now put your phone in DFU mode. If you are unsure of what to do, simply follow the instructions on the interface to get your device into DFU mode. Now, you will be shown your device's model and other details like the latest available firmware. On this page, click "Download" to get the firmware.
Step 3 Get iPhone into DFU Mode
On the final page, click on "Fix now". In a few minutes your iOS device will be working normally.
This is undoubtedly the most effective way to fix iOS issues because there is very little input from the user other than downloading the software, connecting the device, putting it in DFU mode and following the instructions on screen. The software is specially designed so that anyone from a novice to an iOS expert can easily use the software without a problem. This is by far the best method to fix the iPhone stuck on searching issue without losing data.
Part 4 : Restore iPhone with iTunes
If you have created a recent backup, this backup can be used in tandem with DFU mode to restore your device using iTunes. For this, you will need a computer running the latest version of iTunes as well as a cable to connect the device to the computer. Follow the steps outlined below:
Step 1: Launch iTunes on the computer and then connect your device using the cable provided.
Step 2: You will now need to bring your phone into DFU mode. The Device Firmware Update mode will allow iTunes to restore your device with the latest firmware.
To do this on iPhone 6s and below, hold down the Home and Sleep/Wake buttons for about 8 to 10 seconds, then release only the Sleep/Wake button and keep pressing on the Home button until iTunes detects that your phone is in DFU mode. You can then release the home button.
For iPhone 7 and 7 Plus, use the Home and Volume Down buttons in the same way.
For the latest iPhone 8 and iPhone 8 Plus as well as iPhone X, you will need to press the Volume Up and then Volume Down buttons in sequence, and then hold on the Side button until iTunes detects your device in DFU mode.
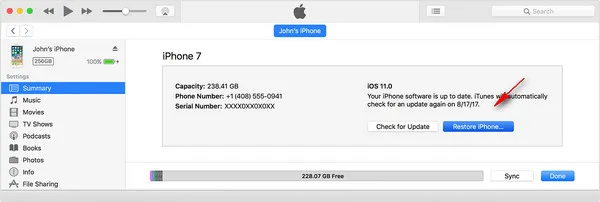
Step 3: On the iTunes interface, click on your device and then click on the "Restore iPhone" option.
Restoring your iPhone this way will delete all of your data and settings, which is why we recommend that you only do this if you have a recent backup in place that you can restore with. If not, all of the data saved on your phone as well as the settings that you may have customised will be gone.
Conclusion:
Usually, the first method will fix the issue in most of the case if there was something wrong with network. TunesBro iOS Repair comes to a great helpf if reset or force restarting failed. It is a must-have tool to solve common issues related to software. Finally, restore would be a consideration if you backed up iPhone in advanced.