Foreign language files can take up a lot of space on your Mac. If you're not bilingual or multilingual, then you should consider cleaning them up and freeing up more space from them. There are a couple of ways to do this, but there are a few things to keep in mind.
If you're using a special tool for the purpose on a Mac running anything higher than 10.10 Yosemite, then you will need to disable SIP, or System Integrity Protection. Also referred to as "rootless", SIP is a feature that prevents accidental or deliberate modifications to certain local system files. To avoid disabling SIP, you can use Terminal to execute directly on the command line to remove unused language files. We'll show you how it's done.
- Part 1. Remove Unused Language Files via Terminal
- Part 2. Auto-delete Unwanted Lanagues Files via CleanGeeker
Part 1. Using Terminal App to Remove Unused Language Files from Mac
Terminal is Mac's command line interface where you can directly execute different types of processes and tasks. It's a much easier way to remove language files if you know the right command, but tread softly if you're not familiar with command line work. Just follow the process exactly as described below:
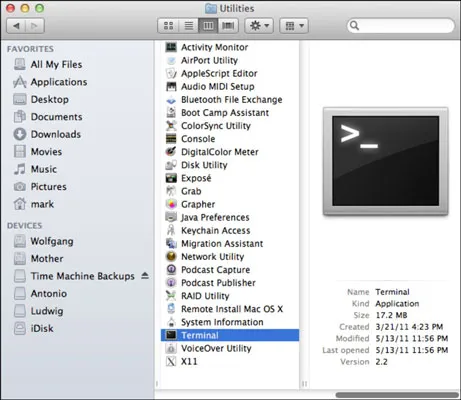
Step 1. In your applications folder, click on Utilities -> Terminal.
Step 2. Input the following command:
sudo find / \( -name *.lproj -and \! \( -name English.lproj -or -name en.lproj -or -name en_AU.lproj -or -name en_CA.lproj -or -name en_GB.lproj \) \) -exec rm -rf {} \;
If you want to delete foreign language files, you can add -name en_AU.lproj -or within the \(\) command and replace en_AU.lproj with the language file to be removed. It depends on what language files are stored in your system, so if you have several of them, it's going to take a while.
Remember, if you don't know what any of that means, don't try and type it out - just copy it and paste it into Terminal and hit Enter. You also need to ensure that you take a full backup of your system before you try executing this command. If certain parts of your applications are code-signed or non-standard, you may break something and need to restore your computer to a previous state.
If you're not confident that you can execute the process properly, then the recommended method is to use a tool specifically designed for the purpose, which is what we'll talk about next.
Part 2 : How to Automatically Find and Delete Unwanted Language Files on Mac
If you're not too happy about using the command line method, then you can consider a robust clean-up tool like TunesBro CleanGeeker. This desktop application does a thorough job of removing any unnecessary files on your Mac OS X or macOS computer. It is also very easy and reliable to use.
Apart from being able to find and delete language files, it can also clean duplicate files, remove apps, manage login items and much more. If you want your Mac to run at optimal levels, then this is the software for you. It is compatible with a wide range of Mac OS X versions, including macOS High Sierra. The best part about this software utility is that it helps you actively monitor your computer's memory and processing resources and periodically do a deep scan and cleanup so your system is always running like new.
Highlights of TunesBro CleanGeeker
- Scan all language files on Mac without inputting a single command.
- Free up a lot of free space by cleaning the junk files.
- Bulk delete third-party apps installed on Mac.
- Extract archive files easily, including ZIP, RAR, 7Z, TAR, GZ, etc...
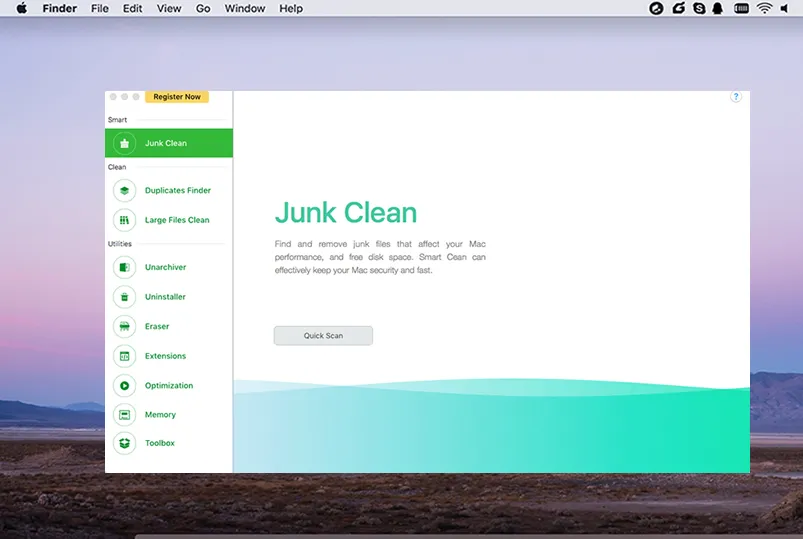
Step 1Install and Open TunesBro CleanGeeker
Install TunesBro CleanGeeker after downloading it from the official site. Open up the app and you'll see the home page, where you can scan your Mac for junk and apps.
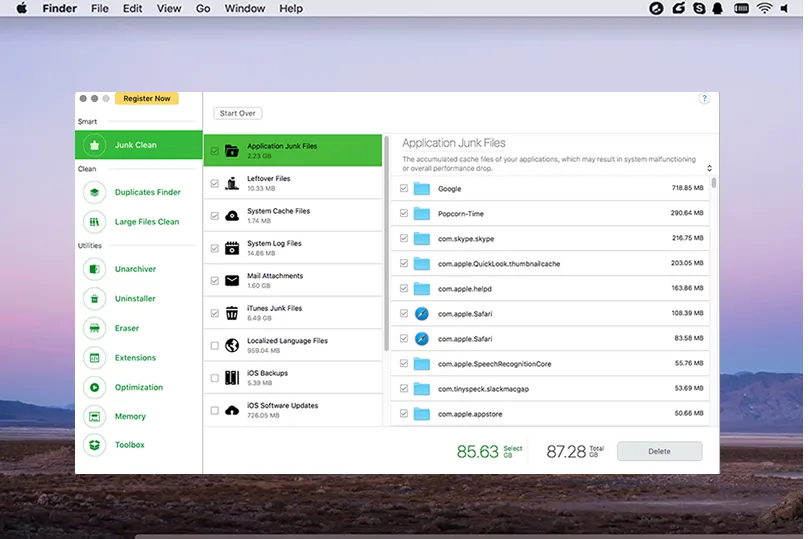
Step 2Scan All Language Files on Mac or Macbook
After scanning, select the "Junk Clean" option on the left panel. You should be able to see all your junk files conveniently categorized by type. Select "Localized language files" from the list, as well as any other junk files you want to remove. You will also be able to see the selected files on the right-side window. Here, you can deselect any language files that you want to keep, such as the English files or your native language files.
Step 3Remove Unused Languages files from Mac
Once you have made all your selections, click on "Delete" to remove the files. In a matter of seconds all unnecessary language files will be permanently removed from your system. Once you restart your computer, you should be able to see a marked difference in performance.
The app makes it easy so you don't have to bother with complex command line work that can break your system. It's a better and quicker way, and it doesn't involve any risk of data loss, so you won't have to do a full backup like you have to with the command line approach.
Summary
Possibly the best feature is how clear the interface looks. No confusing settings, all functions neatly categorized and the entire process is self-explanatory. Just install TunesBro CleanGeeker, let it scan your system and allow it to optimize your Mac OS X experience with very little effort from you as a user.