Protected Excel worksheet or workbook helps you maintain the integrity of data when there are multiple users who have access to the file in question. The feature has been around since the earliest versions of Microsoft's spreadsheet program, but it has gotten more secure over time with advanced AES encryption. To be clear, worksheet protection is not the same as encryption, which refers to a file being locked with a password. Protecting a worksheet means applying editing restrictions so other users can't modify copy or print the contents of the document. Here are several ways to unprotect an Excel worksheet or workbook.
- Part 1. Unprotect Excel Sheet with Password
- Part 2. Unprotect Excel Worksheet with Pro Software
- Part 3. Online Excel Protection Removal Service
- Part 4. Unprotect Excel Sheet by Renaming to .zip
Part 1. Unprotect Worksheet or Workbook with Password
If you know the password with which the document is protected, you can easily remove the protection by following the instructions provided below. It may be slightly different based on which version of Excel you're using, but the general flow is the same.
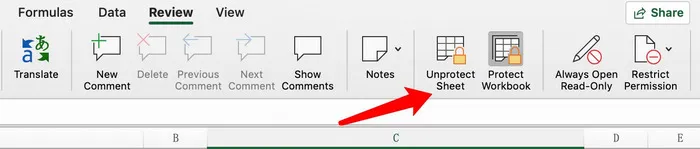
Step 1. Open the worksheet-protected Excel file and click on the Review menu item in the toolbar.
Step 2. Click on Unprotect Sheet under Review tab.
Step 3. A pop-up window will appear prompting you to enter the password. Note that this is not the same as the user password to open a locked file; it is the owner password that prevents editing and other modifications.
After entering the password and clicking OK, your worksheet will be unprotected. You and other users can now copy, modify, or print the contents of the sheet as per your wish.
Part 2. How to Unprotect Excel Sheet If Forgot Password
If you don't know the password to unprotect your sheet, you can use a tool that's specifically built for the purpose, such as Excel Password Remover from TunesBro. The tool is designed to help users recover Excel open password as well as the protetcion password, which is the one that protects the worksheet. The best part about this program is that unprotecting a sheet or even multiple sheets is done instantly so you don't need to wait for long time to get the worksheet or workbook unprotetced.
Step 1 Install TunesBro Excel Password Recovery on PC
Install TunesBro Excel Password Recovery after downloading it from the TunesBro website, and launch the application.
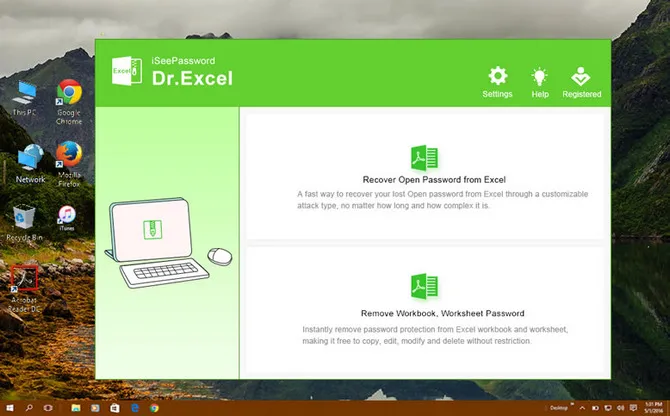
Step 2Open and Import Excel File
On the main page, click on the second option (Remove Worksheet, Workbook Password) to unprotect worksheets. The first option is targeted to recover open password from Excel. In the inner page, click Add File to select the file or files for which you want to unprotect the sheets
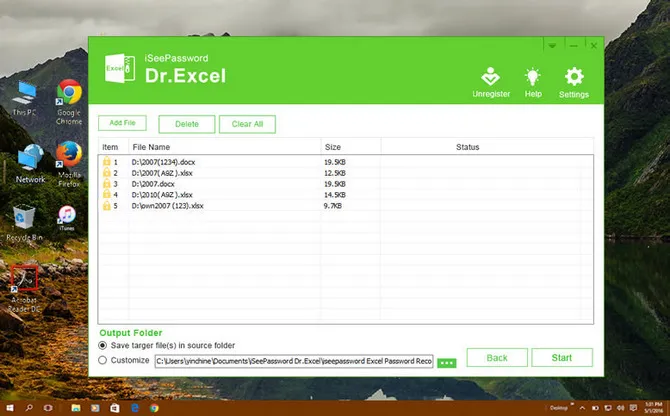
Step 3Remove Protection from Excel Sheet
Specify a location to save the unprotected files and click Start to unlock them right away. That's all there is to the process. You can add as many files as you like so if you have numerous files with worksheets that need to be unlocked for editing or any other modification, this is an ideal tool to consider.
Part 3. How to Unprotect Excel Sheet Online
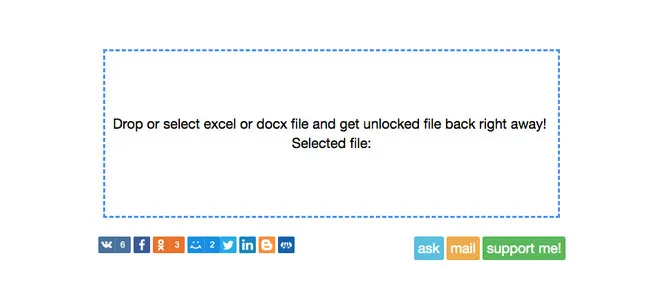
This website (Excel.xartifex.com) offers a quick way to unprotect a worksheet online. It's super-simple to use and quite effective for even the most complex passwords. All you need to do is drag and drop your file or files into the box provided. The file will automatically upload, and your file with the now-unprotected worksheets will be available to download. Save it to the preferred location, and the file is now accessible to anyone for editing and other purposes.
One thing to note is that uploading your private documents over the Internet poses a security risk. It can be hacked during the upload process even if the site itself is secure, so keep that in mind. If you have sensitive information that mustn't get into the wrong hands, this is not a recommended way to unprotect a worksheet.
Part 4. Unprotect Excel Worksheet by Renaming to .zip
This next method involves editing the XML version of a spreadsheet by changing the file type or extension. Excel spreadsheets normally have a .xls or .xlsx file extension. You will need to change this to .zip, then unpack the file and do certain edits in the worksheets when they are in .xml format. Here's the process in detail:
Step 1. Go to File Explorer and right-click on the file for which you want to unprotect worksheets.
Step 2. In the options that you see in the contextual menu, select Rename and change the extension of the file to .zip. Confirm the action when prompted.
Step 3. Unzip the file using a file archive utility such as 7-Zip and view the contents of the unzipped file. You should be able to see several .xml files, each of which represents a worksheet in the original Excel file.
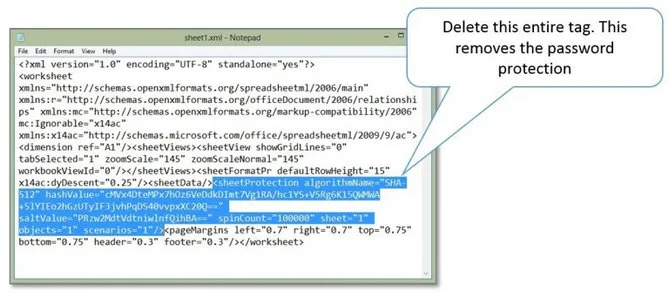
Step 4. Open the .xml file that you want to modify using Notepad. Look for this particular tag (sheetProtection …) in the contents of the file and delete it.
Step 4. Close the archive utility, and if you see a prompt to carry over the changes in the archive, hit Yes. Go back to File Explorer and change the file extension back to what it originally was. When you open the file in Excel, the sheet you modified will be unlocked for editing, etc.
The recommended way is to either get the password from the owner of the file or to use TunesBro Password Recovery. It's a great tool and can break Excel open password in mere seconds. Avoid using the online method if you can, especially if the information inside is of a sensitive or private nature.