Contacts app contains private and confidential details about the person that we are connected with in our daily lives. The smartphones sold nowadays is not only able to store numbers but it photos, email, address and other important information that old cellphone failed to provide. Now, one of the hurdles faced by people when they are using Samsung devices but they want to switch to iPhone.
You might be wondering, what will happen to the contacts stored on Samsung device. Certainly, you should be worried because you cannot simply copy from Samsung device and paste them on iPhone because both works on different operating systems. Moreover, iPhones can't even read contacts from Android devices. But as usual, we have remedy for every issue that could possibly occur in your smartphones. So, in this article we will show 3 amazing ways to transfer contacts from Samsung to iPhone.
- Method 1: The Fastest Way to Transfer Contacts from Samsung to iPhone
- Method 2: Transfer Samsung Contacts to iPhone via Gmail
- Method 3: Copy Contacts from Samsung to iPhone via iTunes
Method 1: The Fastest Way to Transfer Contacts from Samsung Galaxy to iPhone X/8/7/6S
PhoneTrans is one of the miraculous tools developed by TunesBro to make the life of smartphone users easier when people switch their smartphones. This is almost a must-have program for all the smartphone users. Of course, people are changing their phones more frequently and that's why we should have a phone to phone data transferring tool. TunesBro PhoneTrans can transfer over 17+ data types from Samsung to iPhone in just a few seconds. Not only contacts but also multimedia files like music, videos, pictures as well as database related files like messages, WhatsApp and contacts. So, feel free to go ahead and download this program and test them with as much devices as you can.
Top Features of TunesBro Phone Transfer
- Support Android, iOS, Blackberry, Symbian and Windows Mobile.
- Transfer 17+ Types of content from one device to another.
- Restore from backup files made by iCloud, OneDrive, iTunes and Smart Switch.
- Backup smartphone in 1-click without rooting.
Step 1Run TunesBro PhoneTrans
PhoneTrans is available on both Mac and Windows platform. So make sure to download the valid version compatible with the computer and install the program to complete the first step.
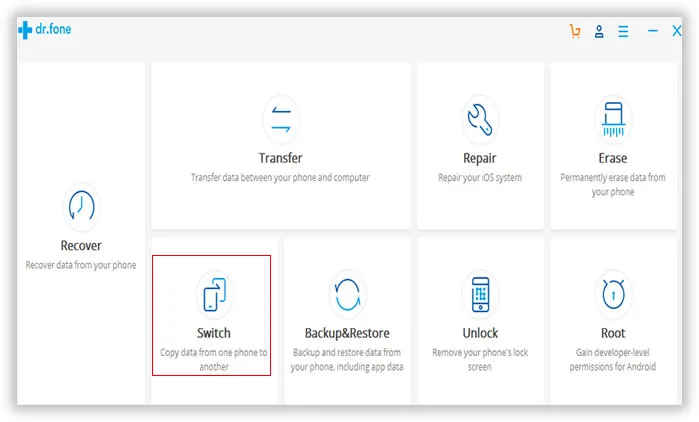
Step 2Connect Samsung and iPhone
Once the program is opened on your PC, it's time to connect both iPhone and Samsung device to PC with 2 different data cables. Now, click on "Switch" from the main screen of the tool.
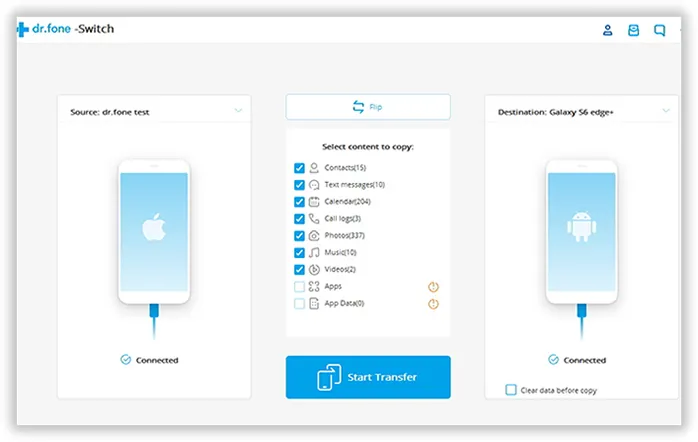
Step 3Select Photos and Start Transferring Process
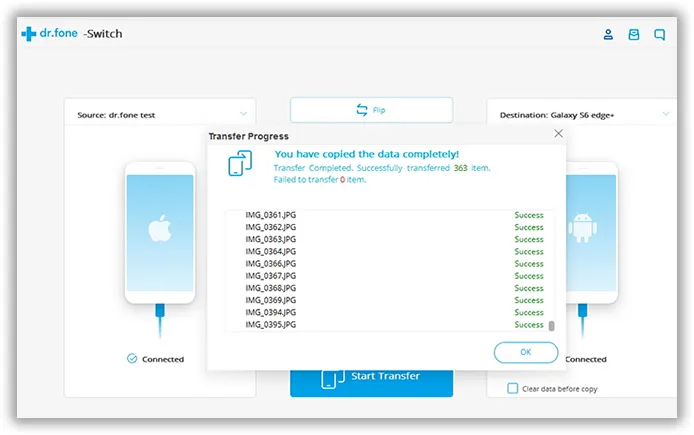
On the next page, both phones will appear side by side. Choose the "Contacts" from menu which you want to copy and click on "Start Transfer". Make sure that the Samsung Device appears on the left and the iPhone on the right or else click on Flip to change the positions. That's it. All the contacts should be transferred from one phone to another in just a matter of seconds.
Simple and easy enough, right? That is the reason why we rate this method at No.1 postion.
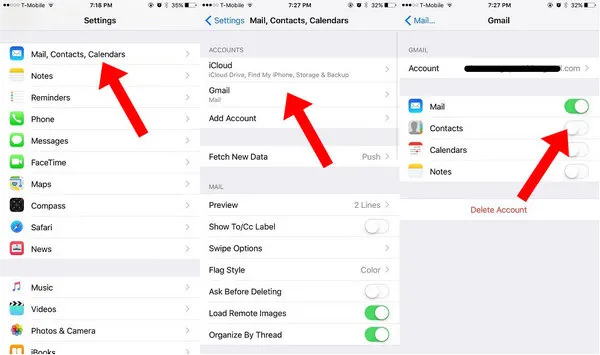
Method 2: Transfer Samsung Contacts to iPhone via Gmail
Google provides one of the best solutions when it comes to transfer contacts from one smartphone to another. Actually, Gmail is accessible on all smartphones, so if you can simply sync the Contacts one Samsung device and then sync your iPhone with Gmail then all the contacts will be transferred to your iPhone as Gmail detects both operating systems without any issues
So, basically, open the Contacts in Samsung device and sync them with your Google account. Next, open the same Google account on your iPhone and let your device download all the contacts from your Google account.
Please note, Google deletes all the data from its database within 30 days after you have synced your device and make sure to use the same Gmail ID to complete this process.
Method 3: Copy Contacts from Samsung to iPhone X/8/7/6 via iTunes
iTunes is a program you should be familiar with if you were an iOS user. This is the official program to manage iOS device on a computer. One of the most important features of iTunes is content backup and syncing. Here in this method, we would employ the use of a wonderful facility provided with Apple products - iTunes. So the basic idea is to sync your data to iPhone via iTunes.
Step 1: Before you begin with this method, make sure you have got a computer you are syncing your data to, rather than just simply syncing with the cloud.
Step 2: Now; connect your Android device to your PC and sync both the systems together.
Step 3: Make sure your address book is being synched to your Windows Address Book or Outlook Express. Once your data has been synched to any of these programs; plug in your iPhone to your computer.
Step 4 : After plugging in your iPhone to the computer, synch your iPhone with it. Open your iTunes app, and click on the "iPhone" icon beneath the playback controls in the top left corner of the operating window.
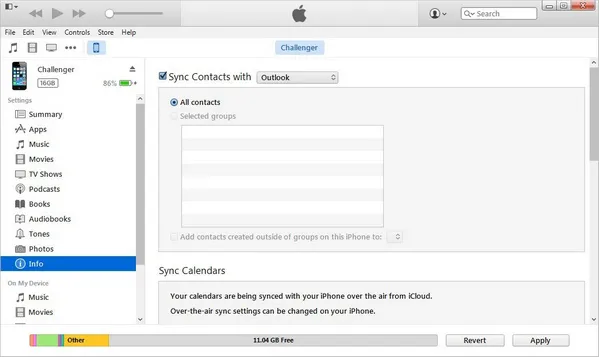
Step 5 : When "iPhone management screen" opens, click the "info" tab. On the screen that follows; look out for "Sync Contacts With" to ensure address book syncing. From the drop down menu, select the address book program that you had previously in step 3 (outlook express or windows address book).
Step 5 : Click on the button "All Contacts". Now, click on the "Apply" button at the bottom right corner to save this setting and transfer all your contacts to your newly purchases iPhone.
Conclusion:
Like we mentioned, iTunes and Dropbox has limitations that are hard to overcome, especially if you have a huge collection of photos. In that case, you should use Phone Transfer because it has no limits on how many photos or data you are transferring from one device to another. Although, we demonstrated how to transfer photos in this guide but you can also transfer messages, contacts, notes, documents, etc. by using the same procedure. So, even if you buy a new smartphones every month, you don't have to worry about leaving your data behind anymore.