Photo contains the best memories of our lives, whether if they remind you of the awesome trips you have taken in the past or families and dear ones. Looking at those photos really bring back some joy in our lives. Photos looks much clearer on bigger screens such as iPad or computer screen. If you are a Samsung phone user and you buy a new iPhone or iPad then you may want to transfer them to the new device but unfortunately, there's no app available on Android or Apple devices that can connect both smartphones.
So, in order to transfer photos from Samsung to iPhone/iPad, you will have to take assistant from third party apps or software. Luckily, there are three perfect ways to copy photos from Samsung to iPhone/iPad. And in this tutorial, we will demonstrate all 3 ways and you can use any of them in this guide to fulfil this task successfully.
- Method 1: Transfer Photos via Phone Transfer Software
- Method 2: Copy Samsung Photos to iPhone With the Help of iTunes
- Method 3: Transfer Photos to iPhone/iPad by Dropbox
Method 1: How to Transfer Photos Between Samsung Galaxy Phone and iPhone/iPad
The most comfortable way to transfer unlimited photos from Samsung to iPhone without using any complicated apps is to take help from an Android to Apple data transferring tool. TunesBro Phone Transfer doesn't need iTunes or any others third party apps to transfer photos from Samsung to iPhone. Rather, it creates a bridge connection between your smartphones, so that you can transfer all the photos from Samsung to Apple with a sole click on your mouse.
Top Features of TunesBro Phone Transfer
- Copy content from one phone to another in a few minutes.
- Support Android, iOS, Windows Mobile, Blackberry and Symbian.
- Able to transfer contacts, messages, call log, photos, WhatsApp and music.
- Backup and restore smart phone data in one click.
Step 1Download and Install
Install the program on a PC or Mac computer and open it after finishing the installation. You will see the main user interface is like the following:
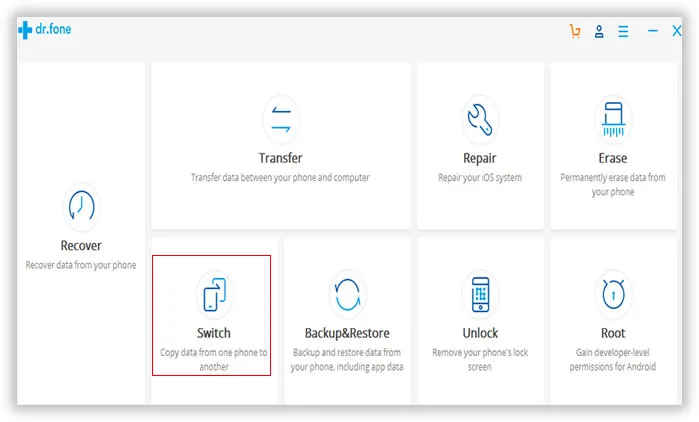
Step 2Connect Smartphone to Computer
Select "Switch" on the interface of the program and get your Samsung smartphone and iPhone connected to the PC. If everything goes well, then you will see the device name on the screen.
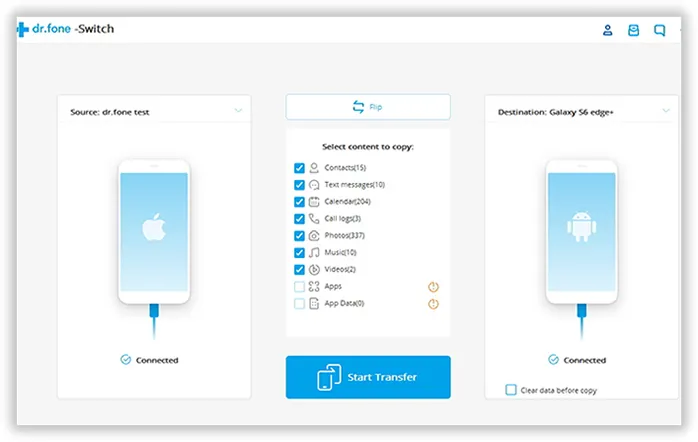
Step 3Select Photos and Start Transferring Process
Under the "Select content to copy" menu, choose "Photos" and press "Start Transfer". Make sure the source tab shows your Samsung phone and destination tab shows your iPhone. If not, then click on the "Flip" button to reset the positions of the smartphones.
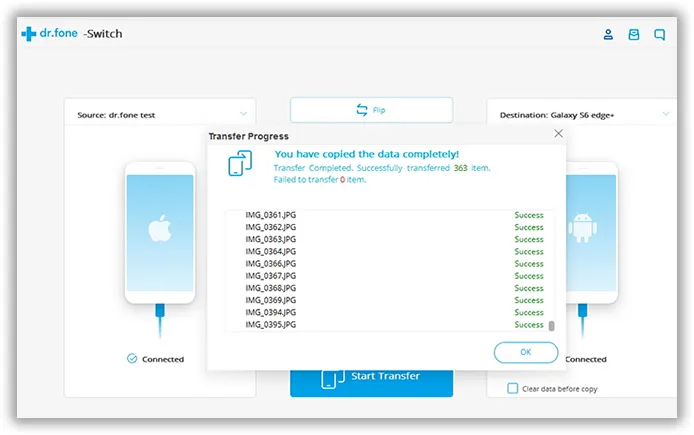
You will be able to track the transferring process in the real time and once the transferring is done, you can check your iPhone to find all the pics from your Samsung phone.
Method 2: How to Move Samsung Galaxy S5/S6/S7 Photos to iPhone X/8/7 with iTunes
iTunes is a great tool to transfer all photos from Samsung to iPhone/iPad. But of course you cannot do it directly so follow these rules to transfer photos from Samsung to iPhone/iPad with iTunes:
Step 1: Connect your Samsung smartphone to PC and copy all the images to your computer.
Step 2: Install the latest version of iTunes on your computer and sync the photos with your iTunes now.
Step 3: Connect your new iPhone to PC and sync it with the iTunes where you saved all the photos.
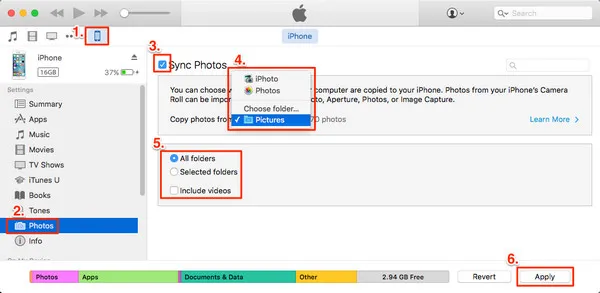
Step 4: Now, check your iPhone and all the images should be successfully transferred now.
However, syncing iPhone and Android phone with iTunes can be very challenging and tough, especially for the users who are not familiar with iTunes. Also, it is time consuming method.
Method 3: Transfer Samsung Photos to iPhone X/8/7 by Dropbox
Dropbox is an outstanding online cloud server where you can save all of your data from your smartphone or computer. Later, you can access them from anywher you want by signing Dropbox credential. You can upload the photos on Samsung to its cloud server and download it on your iPhone afterwards.
Step 1: Install Dropbox on Samsung smartphone from Google Play Store.
Step 2: Create a free account on Dropbox and upload all the pictures on your Dropbox account.
Step 3: Again, install Dropbox on your iPhone from Apple store.
Step 4 : Login to your Dropbox account using the same credentials and download all the photos on your iPhone now.
Please note: Dropbox has a limit of uploading for only 1 GB data. You have to buy additional storage if the photos exceeded the free amount. Dropbox automatically deletes all your files from there server after 30 days. Another thing to be considered is that it would takes hours to download the photos if the Internet connect was slow.
Conclusion:
Like we mentioned, iTunes and Dropbox has limitations that are hard to overcome, especially if you have a huge collection of photos. In that case, you should use Phone Transfer because it has no limits on how many photos or data you are transferring from one device to another. Although, we demonstrated how to transfer photos in this guide but you can also transfer messages, contacts, notes, documents, etc. by using the same procedure. So, even if you buy a new smartphones every month, you don't have to worry about leaving your data behind anymore.