The recent Moto series has been a blast in 2017 due to its higher specifications and reasonable price that has never been introduced before. Each Moto series smartphone has at least 16 to 32 GB internal memory with 64GB expandable memory; so there's no way that you will run out of space with the latest models.
But as you guys already know, just like any other Android smartphones, Moto phone also havs a petrified tendency to malfunction, crash and get under virus attack for installing untrusted apps. As a result, all of these issues causes data loss. Hence, you will end up losing important information such as pictures, contacts, messages and other private stuffs unknowingly.
So, to keep everything up to date and on the safe side, you must backup the device regularly. Android experts suggest backing up your full phone at least bi-weekly or whenever you save important data on it. Backing up Moto phone is not that hard and can be achieved by following few simple tricks and tweaks that we will mention in this guide. So, get thrilled and use any solution shared in this comprehensive tutorial.
- Method 1: Backup Moto Z/X/G/E with Default Backup Option
- Method 2: Backup Moto Phone to PC without Root
- Method 3: Backup Moto Phone with Android App (Root Required)
Method 1: How to Backup Moto Z/X/G/E with Default Backup Option
All Moto Android phones have an in-built backup and restore feature that can be used to backup your entire device and save it on your preferred cloud service. Follow these below steps to create a backup of your Moto phone.
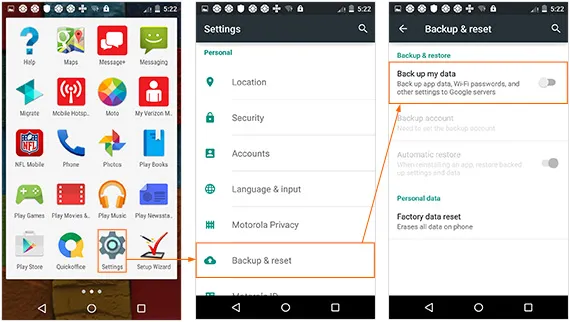
Step 1: Unlock your phone and open the menu.
Step 2: Slide over and find the Settings.
Step 3 : Scroll down to the bottom and select "Backup & Reset".
Step 4 : Toggle on "Backup my data" and select a backup account.
Step 5 : Link your device to an active Google account and save your phone's data on your Gmail account.
Cons: Backup files will be erased automatically after 30 days. And you can't backup data more than 1 GB.
Method 2: How to Backup Moto Phone to PC without Root
If you are looking for a way that backup Moto phone with a single click and transfer the backup file directly to PC, then TunesBro Android Manager is the right software to go with. It is the ultimate solution to manage your Android smartphones and backup entire device without any hassle. It simply requires one single click on your mouse and BAM! Your whole phone will be successfully backed up. What's interesting is that it offers to backup 50+ data types that include pictures, videos, music, contacts, messages, notes, reminders, WhatsApp chats and much more.
Additionally, it has many other useful in-built tools that could be very handy like rooting your device with 1 click, restore from backup, send and receive messages from computer, play Android apps and games on your PC and so on. It has an amazing attractive design that could explain all the features by itself. Yet for your convenience, we are going to mention how to use this tool in a step by step guide below.
Main Features of DroidGeeker
- Flexible backup option: full backup or partial backup.
- Easily restore lost files from backup file.
- Export individual items from Android separately.
- Download and install Android apps via PC.
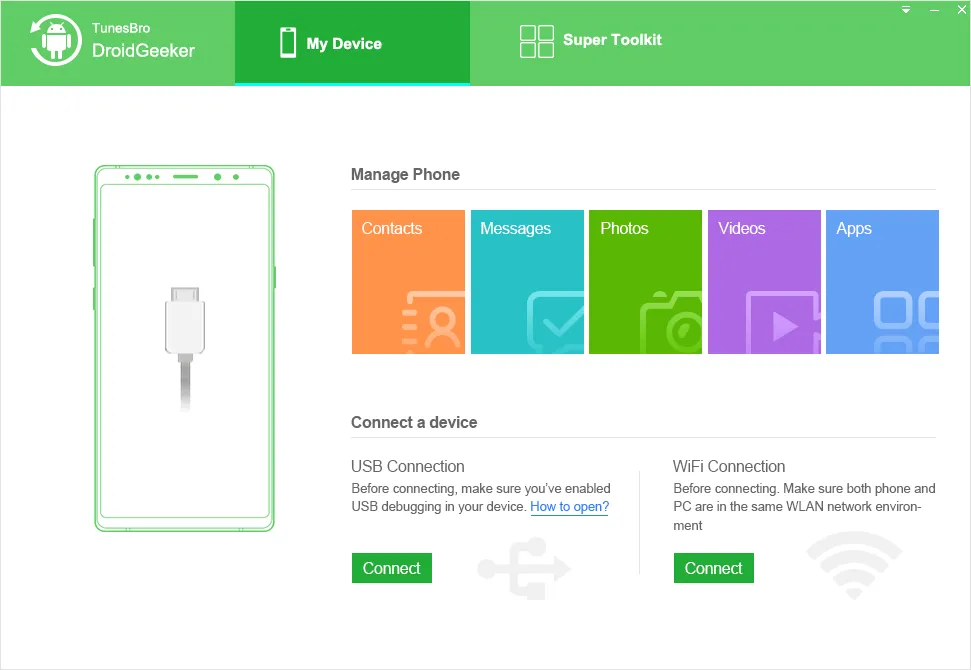
Step 1Install the Program on PC or Mac
Visit the product page to download the trial version on a Mac or Windows computer. Then, open the downloaded file and install the program. Next, open the program on your computer. Here is the screenshot of first window. The next move is to choose "Backup & Restore" to proceed to next step.
Step 2 Plug Moto Phone to Computer
The software requires commuinication between Moto phone and the computer. So you have to enable USB debugging on the phone. After that, connect the phone to computer with USB cable. A minute later, you will see the device name displayed on the screen. So you can take further actions from the program.
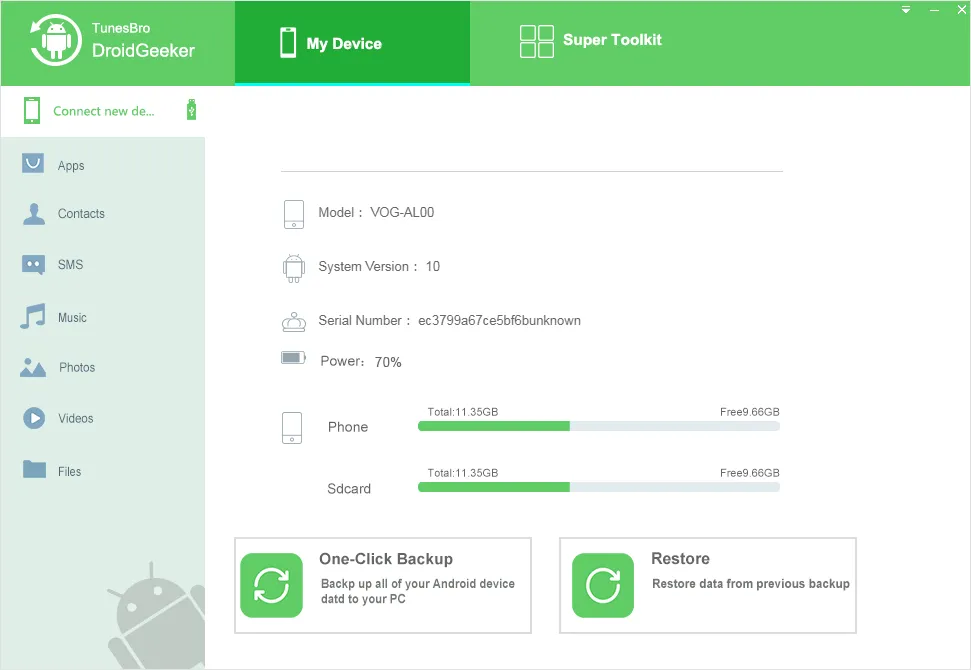
Step 3 Choose Data Type for Backup
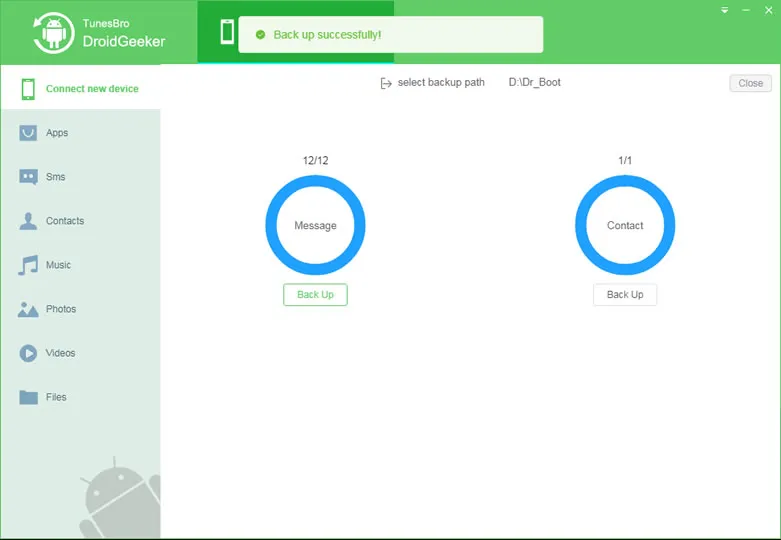
Choose all the options that you wish to backup by clicking on them and locate the folder where you want to save the backup file on your PC. Now, you are all done! Simply hit the "Back Up" button and wait until all the information is successfully backed up to your PC.
You will be able to track the backup status live on the main screen and once the progress is filled to 100%, it will close automatically and you can open the folder where you have saved the backup file.
Step 4 How to Restore from Backup
Once you backed up the phone with Android Manager, you can restore data from backup file at any time. However, the "Restore" function is not easy to find out. Please move to My Device window and locate "Restore" option. At there, you can restore delted or lost files.
Method 3: How to Backup Moto Phone with Android App (Root Required)
Titanium Backup app is indeed a sage and sleek solution to backup your full Android smartphone but it is requires you to root your device. Moreover, it's not a free app and requires a small fee to register the app.
Step 1: Install Titanium Backup app on your Moto X/G/E phone and open the app.
Step 2 : Move to the "Backup/Restore" section and scroll down to the "backup" tab.
Step 3 : Titanium backup let you decide what kind of data to backup, so you can choose that option and save the backup on your smartphone or you can directly upload it to the cloud.
Step 4 : Finally copy the backup file on your PC or you can upload it to your Google Drive account.
Cons:
1. Rooting voids the warranty of Moto X/G/E phone.
2. Free to try but have to pay for full backup.
Conclusion:
Backing up data is lot crucial than you can possibly imagine. You never know when your smartphone gets mad and malfunctions to death. If you have a backup saved on your PC or cloud server then you can at least retrieve all the important stuff and information to your new smartphone. Wondershare MobileGo also offers to restore backups on your desirable Android phone with easement. And remember to check reviews of any software or app you use so that you don't end up downloading useless junk programs.