Apple invented the iPhone in 2007, and it was the pinnacle of smartphones becasue of Apple ecosystem. Companies like Nokia were relying on hardware, while Apple focused on both. iPhone was probably the beginning of the iOS and pushed Google's Android OS as well.
In recent years, Apple saw a huge market in the entertainment industry, so they launched iTunes, where they can sell music, videos, and clips in the highest quality available from the label on the platform. iTunes store is not for free, and they charge few bucks for every music you want to download it. So here comes the question: how to transfer music from one iPhone to another when upgrading to the latest iPhone model? This is not tough issue but it needs time to figure it out. Below are the most popular solutions for music transfer.
- Method 1: Sync Music with iCloud Music Library
- Method 2: Transfer Music with Phone Transfer (Fastest)
- Method 3: Use iTunes to Transfer Music
- Method 4: Transfer Music via Bluetooth or AirDrop
- Method 5: Copy iPhone Music by SHAREit iOS App
Method 1: Transfer Music from Old iPhone to New iPhone via iCloud (without iTunes)
Apple started its own music subscription service in 2018. After paying a mount of fee, your personal music puchased in iTunes store can be accessed on multiple iOS devices under the same Apple ID. This feature makes it easily to transfer music on old iPhone to new iPhone with iCloud Music Library. However, only purchased music will be synced to new iOS device. Music being downloaded or ripped from other sources won't be able to sync.
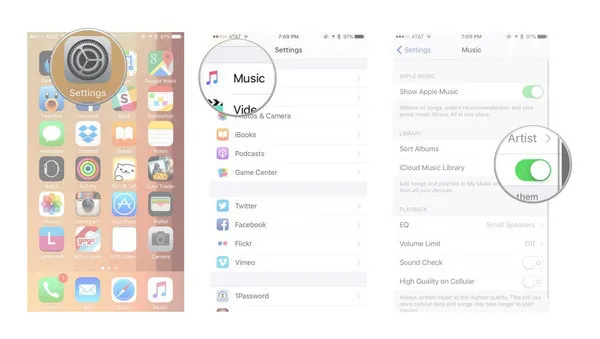
Step 1: Login Apple ID on old iPhone and turn on iCloud Music library (Settings -> Muisc -> iCloud Music Library). Wait for the syncing to be done on iCloud Server.
Step 2: Sign out Apple ID on old iPhone and sign in on the new iPhone with the same Apple ID.
Step 3: Now turn on iCloud Music Library on new iPhone and the music will be copied to new iPhone within a few hours depending on how larget the music library is.
Tip: Create a folder and rename it "music," so you won't find it difficult to download the music to your new phone and it eliminates the manual work.
Cons:
- Active Apple Music Subscription.
- Only purchased music will be transferred.
- Take a lot of time for syncing.
Method 2: The Fastest Way to Transfer Music from One iPhone to Another
There are many limitations when it comes to an Apple device because Apple likes to have full control over their business. But, it can not stop other software companies providing more advantages for managing your iPhone. Reputed software company TunesBro has developed an amazing program called Phone Transfer, a well-known tool for transferring content between two smartphones or tablets. The transfer goes directly between two devices via USB connection. The transfer speed is 10X faster than iCloud and wireless solution such as Bluetooth or AirDrop. Mostly important, all music, included purchased and downloaded, will be copied to new device.
Top Features of TunesBro Phone Transfer
- All Music will be transferred, no matter it is purchased or downloaded.
- Besides music, also support content transfer for contacts, messages, photos, video and call log.
- Work seamlessly for latest Android and iPhone devices.
- Support Windows and macOS.
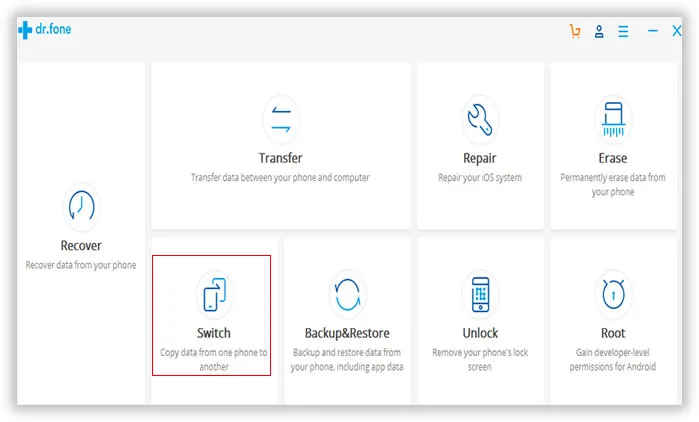
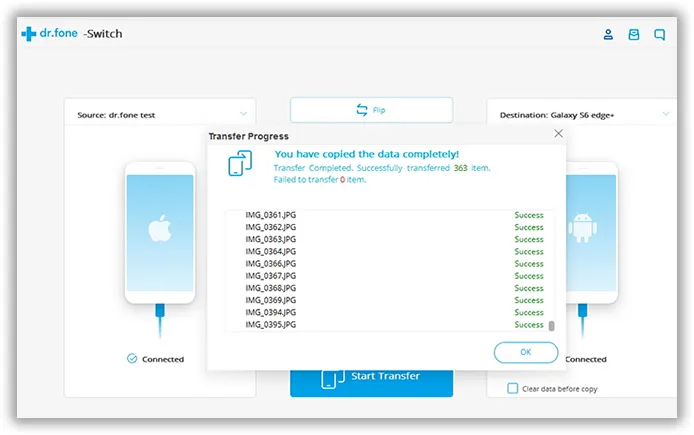
Step 1Open TunesBro PhoneTransfer After Install
You can download the official version of TunesBro Phone Transfer and install it on your Windows and macOS PC. Launch the program and click on "Switch" tab to open the transfer protocol.
Step 2Plug Two iPhones to Computer
Connect two iPhone devices to your desktop using lighting cable and don't worry about the drivers because Phone Transfer will install them after adding the devices.
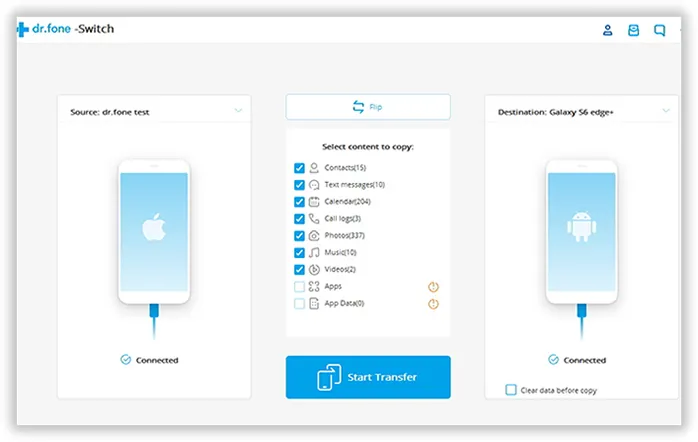
Step 3Start Copying Music from Old iPhone to New iPhone
Now, select the files you want to transfer between the iPhone. In the snapshot, we have selected "Music" and clicked on "Start Transfer" to begin the process. It takes around 5 minutse to 20 minutes to transfer the file. The time depends on the number of music files and file size as well.
TunesBro Phone Transfer enables you to transfer data between iPhone to iPhone or iPhone to Android in a few clicks, which is convenient. It provides a free trial version so that you can give it a shot, but if you want to use it multiple times, then you better opt for the premium version for a lifetime license. The lifetime license will enable you to use it for years, and you also get free updates from the company.
Method 3: Transfer Music from iPhone to iPhone with iTunes
Apple introduced iTunes to help iPhone users to manage their device on computer. iTunes comes with many features, and one of them is a music library. It allows you to manage the content on your phone from a Windows desktop or Mac. You can connect your iPhone to iTunes and save the music files on the desktop; then you can copy the music files to another iPhone.
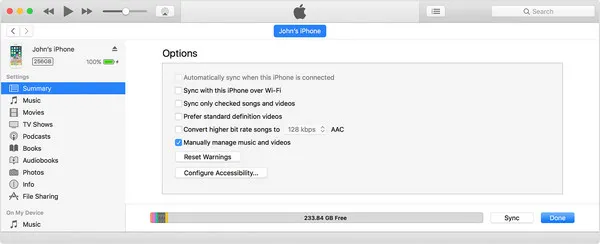
Step 1: Launch iTunes on your desktop and connect your device to the PC using USB cable. Make sure the iTunes program recognises your device. Go to Songs and add music to the library and you can drag and drop the music on the library tab.
Step 2: Now, go to Summary, then select "Manually manage music and videos," also select "sync only checked songs and videos."
Step 3: After adding songs to the library, then conntect your new iPhone to computer. Now, drag and drop those songs to it. iTunes will synchronise and transfer the music files to the new iPhone.
Cons:
- Only local music will be synced .
- The two iPhones should run the same iOS version.
- Syncing would get corrupted occasionally.
Method 4: Transfer Muisc from iPhone to iPhone Using Bluetooth or Airdrop
All iPhone comes with Bluetooth technology, and you can utilize it to transfer music from one device to another device. You can do the same thing with Apple Dirdrop technology.
For Bluetooth: Enable Bluetooth function on both iPhones. Tap on Bluetooth button on old iPhone and connect it to new iPhone. Once connected, select the music file on old iPhone and send it to new iPhone.
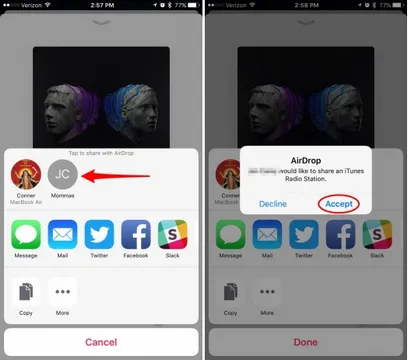
For Airdrop: Open Music app on old iPhone and tap on the music files you want to share with new iPhone. Now tap "Share" button. From the pop-up windows, choose "Airdrop" users you want to share. After that, you will see an alert on new iPhone and tap "Accept" to get the music files.
Cons:
- connection error duing device pairing .
- Device can't be recoginzed by another.
- Slower transferring speed.
Method 5: Transfer Muisc from iPhone to iPhone (without Computer) Using SHAREit App
I have seen many people who want to transfer files from iPhone to iPhone, but it isn't that easy because Apple limited the usage of Bluetooth, WIFI and other technology freedom on Apple devices.
SHAREit is a unique application that creates a hotspot to connect to another device, then they both transfer data like Internet protocol. Thus, iOS device has no choice but to let the application communicate as they please because there is no policy violation. Yes, you can SHAREit to transfer music files from one iPhone to another iPhone without paying a single penny or any limitations.
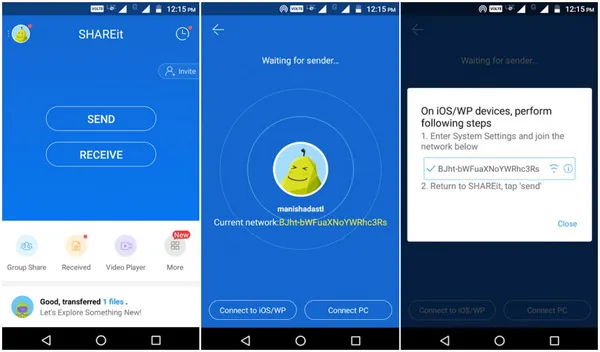
Step 1: Open SHAREit app on both smartphones.
Step 2: Let the sender select the music files and head to "SEND". The receiver should set the SHAREit to "RECEIVE".
Step 3: Find the Android devcie name and connect to it.
Step 4 :The SHAREit app will begin looking for the devices nearby, and you can transfer them automatically to the SHAREit folder. You can find the music files in the SHAREit folder and the application if free to download.
Cons:
- Not available on old iOS version.
- Imported music not automatically synced to music library.
- Music might get damaged or quality loss after transfer..
Summary:
I have shared many tips like AirDrop, Bluetooth, SHAREit, iTunes, and TunesBro Phone Transfer. You can use any one of the methods to transfer the files in a few clicks. I recommend you to try PhoneTransfer method because you can transfer files in a few clicks without limitation.